

Create an instance
An instance is one virtual machine (VM). There are three ways to get one, depending on what your provider offers:
- Fixed plans. You order a plan from your provider’s store or billing portal, and the instance appears in your panel ready to deploy. Billing happens outside the panel.
- Cloud Service. The built-in pay-as-you-go model. You hold a credit balance and each running instance is metered against it by the hour. You pick a location and a plan in the panel.
- Self-Provisioning pack. Your provider hands you a pool of resources (CPU, RAM, storage, IPs) and you create and destroy instances inside that pool, with no per-hour charge.
Before you begin
Section titled “Before you begin”- For Cloud Service: enough credit balance to cover the instance’s hourly rate. See Billing and credits.
- For a Self-Provisioning pack: a pack assigned to your account by your provider, with free capacity in its pool.
- Optional but recommended: an SSH key saved under Compute > SSH Keys so you can log in without a password. See SSH keys.
Where to find it
Section titled “Where to find it”In the user panel go to Compute > Instances and click Create Instance. This opens a single Create instance page with numbered sections that fill in as you go: Location, Operating system & access, Plan type, Plan, and Network & access. A Provision from a pack link in the top right jumps to the separate Self-Provisioning flow instead (see below).
Cloud Service: pick a location, OS and plan
Section titled “Cloud Service: pick a location, OS and plan”The page starts with only 1 Location visible; each answer reveals the next section.
-
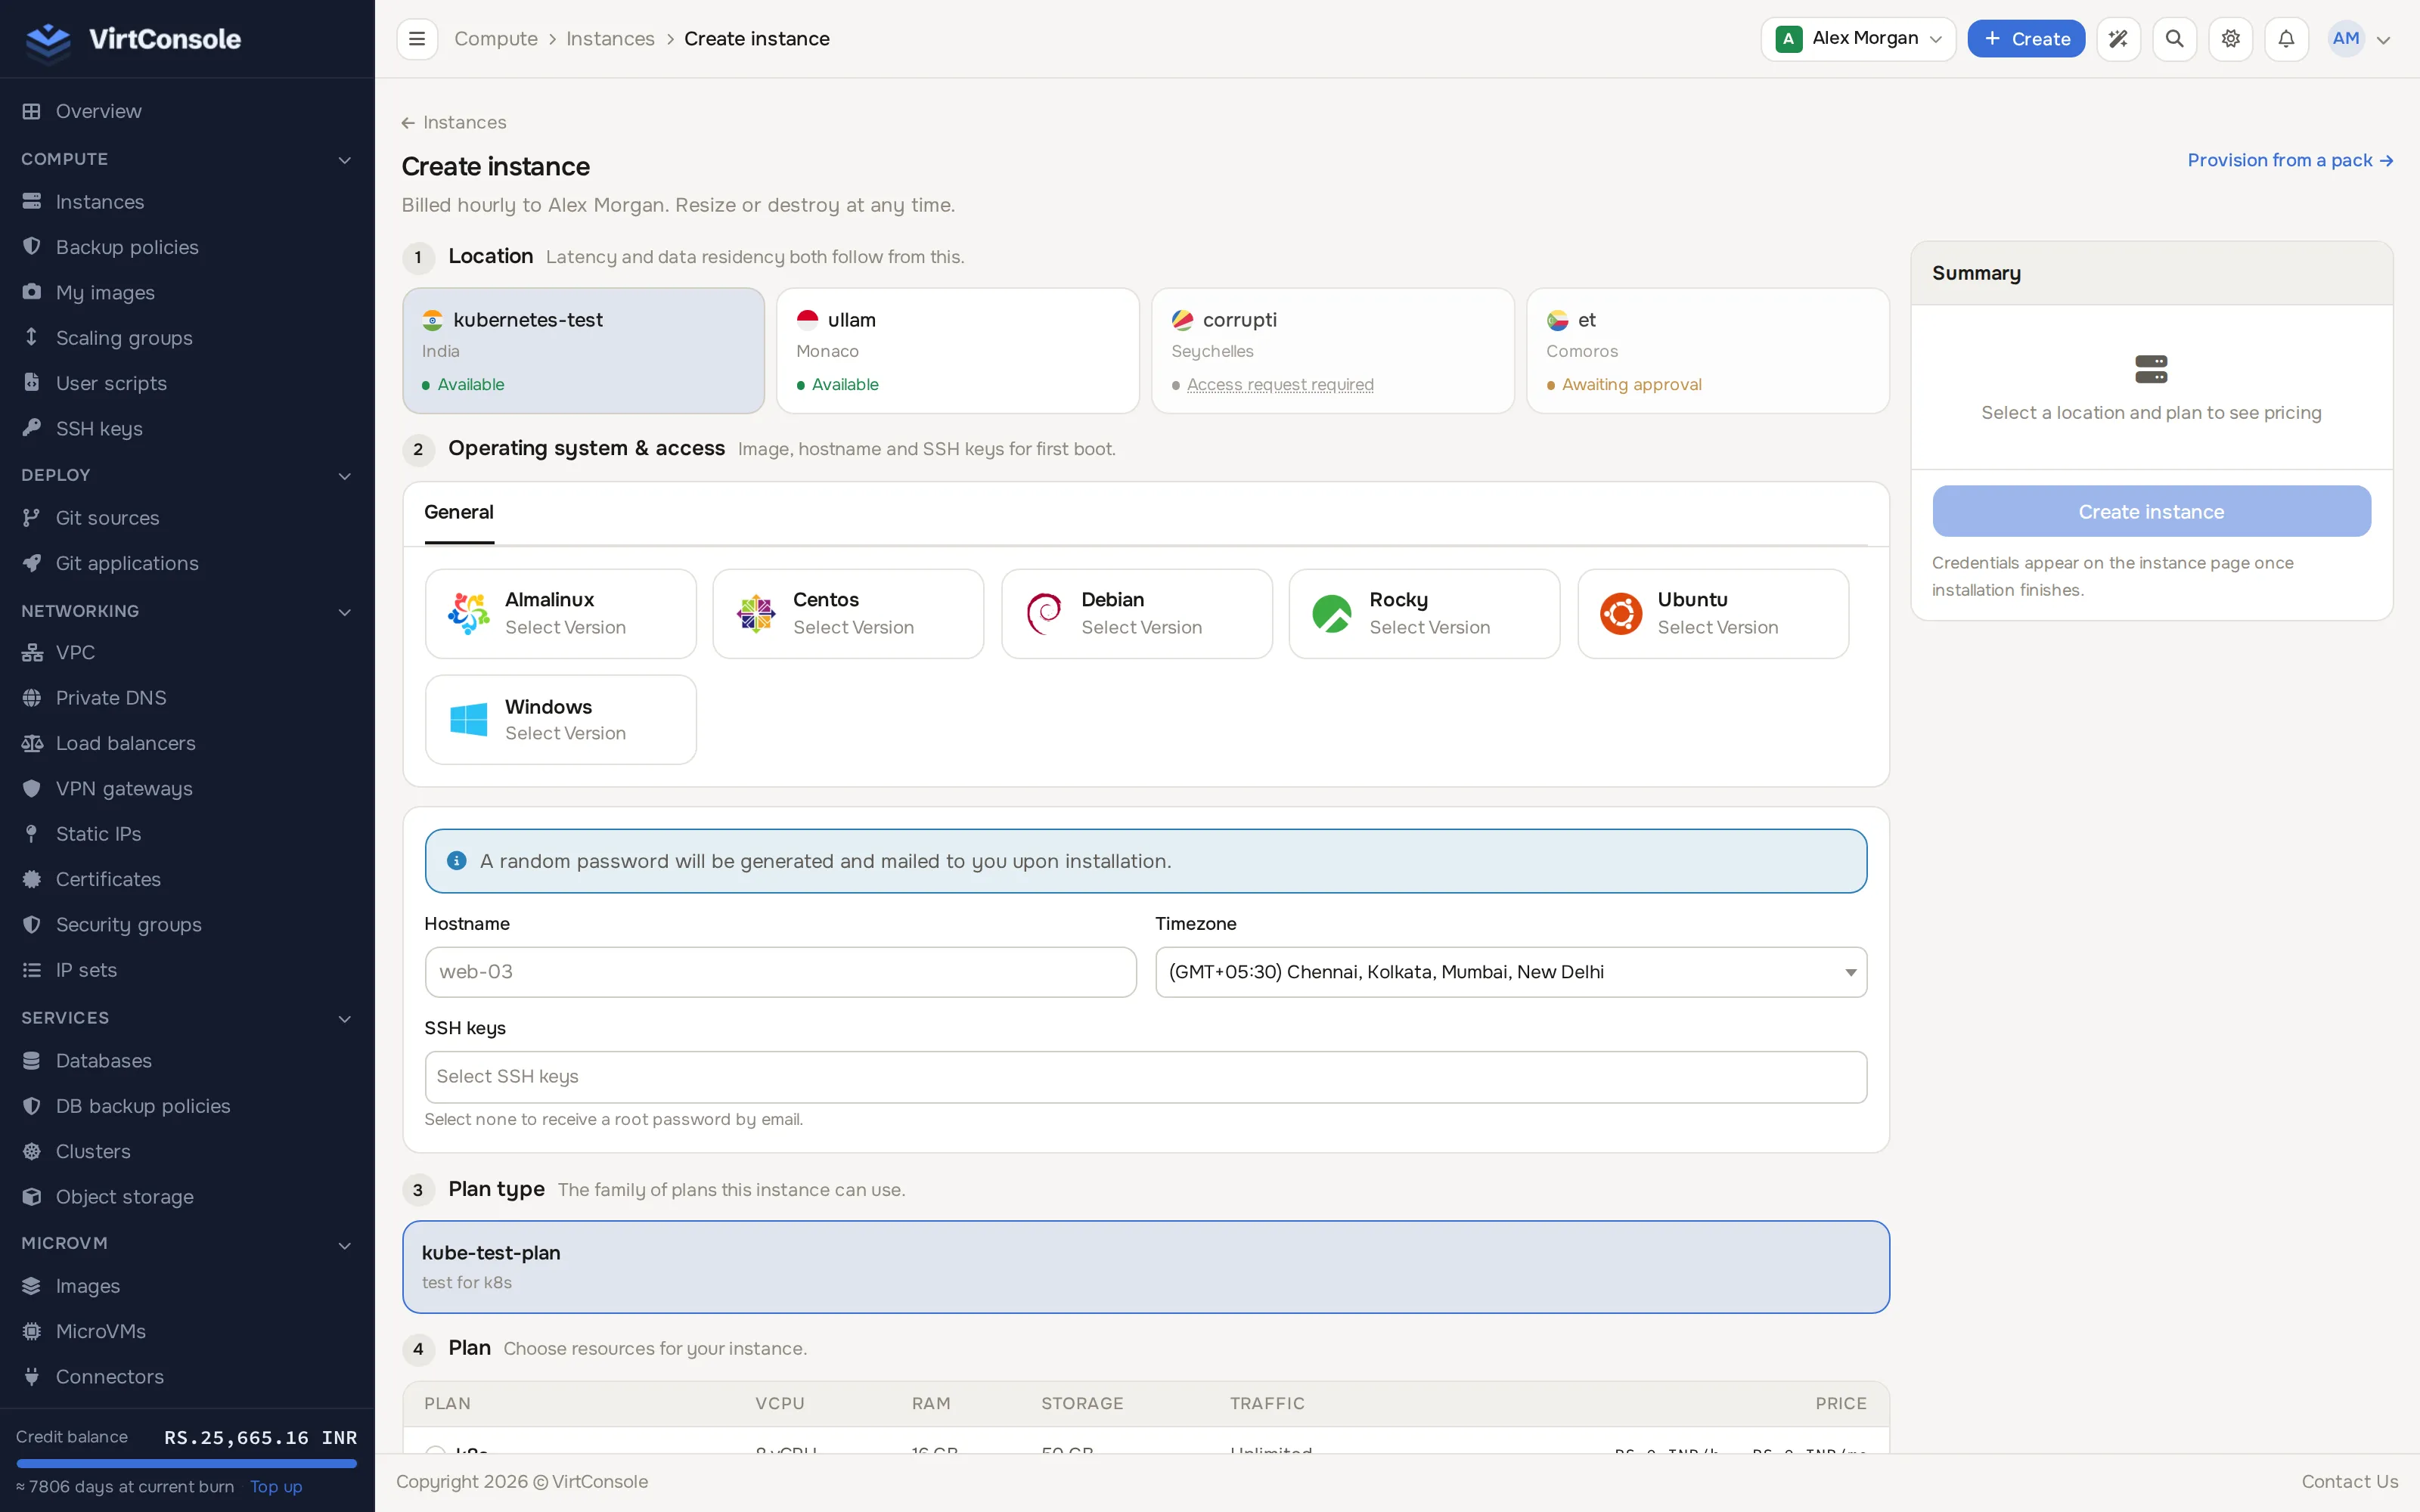
Click a Location card (the data center closest to your users). Locations your provider has not opened to you show Access request required or Awaiting approval instead of Available.
The Create instance page with a location picked, showing the Operating system & access, Plan type and Plan sections.
-
Under 2 Operating system & access, click an OS logo (Ubuntu, Debian, AlmaLinux, Windows, and so on) and pick a version. If you have saved custom images, switch to the My Images tab instead. Enter a Hostname, pick a Timezone, and (for Linux cloud-init images) select SSH keys and optionally tick Install Docker Engine & Docker Compose or add cloud-init User data (click or pick a user script to run a saved user script instead). Leaving SSH keys empty gets you a mailed root/Administrator password.
-
Under 3 Plan type, click a plan type card (for example Budget or kube-test-plan). With one plan type available it is picked for you automatically.
-
Under 4 Plan, click a plan row in the table. Each row shows vCPU, RAM, storage, traffic and the price (hourly, monthly or both, depending on your provider’s settings).
-
If the section appears, 5 Network & access lets you assign reserved Static IPs instead of an auto-assigned one, and attach the instance to a VPC and subnet if the location supports private networking.
-
Check the Summary card on the right, then click Create instance.
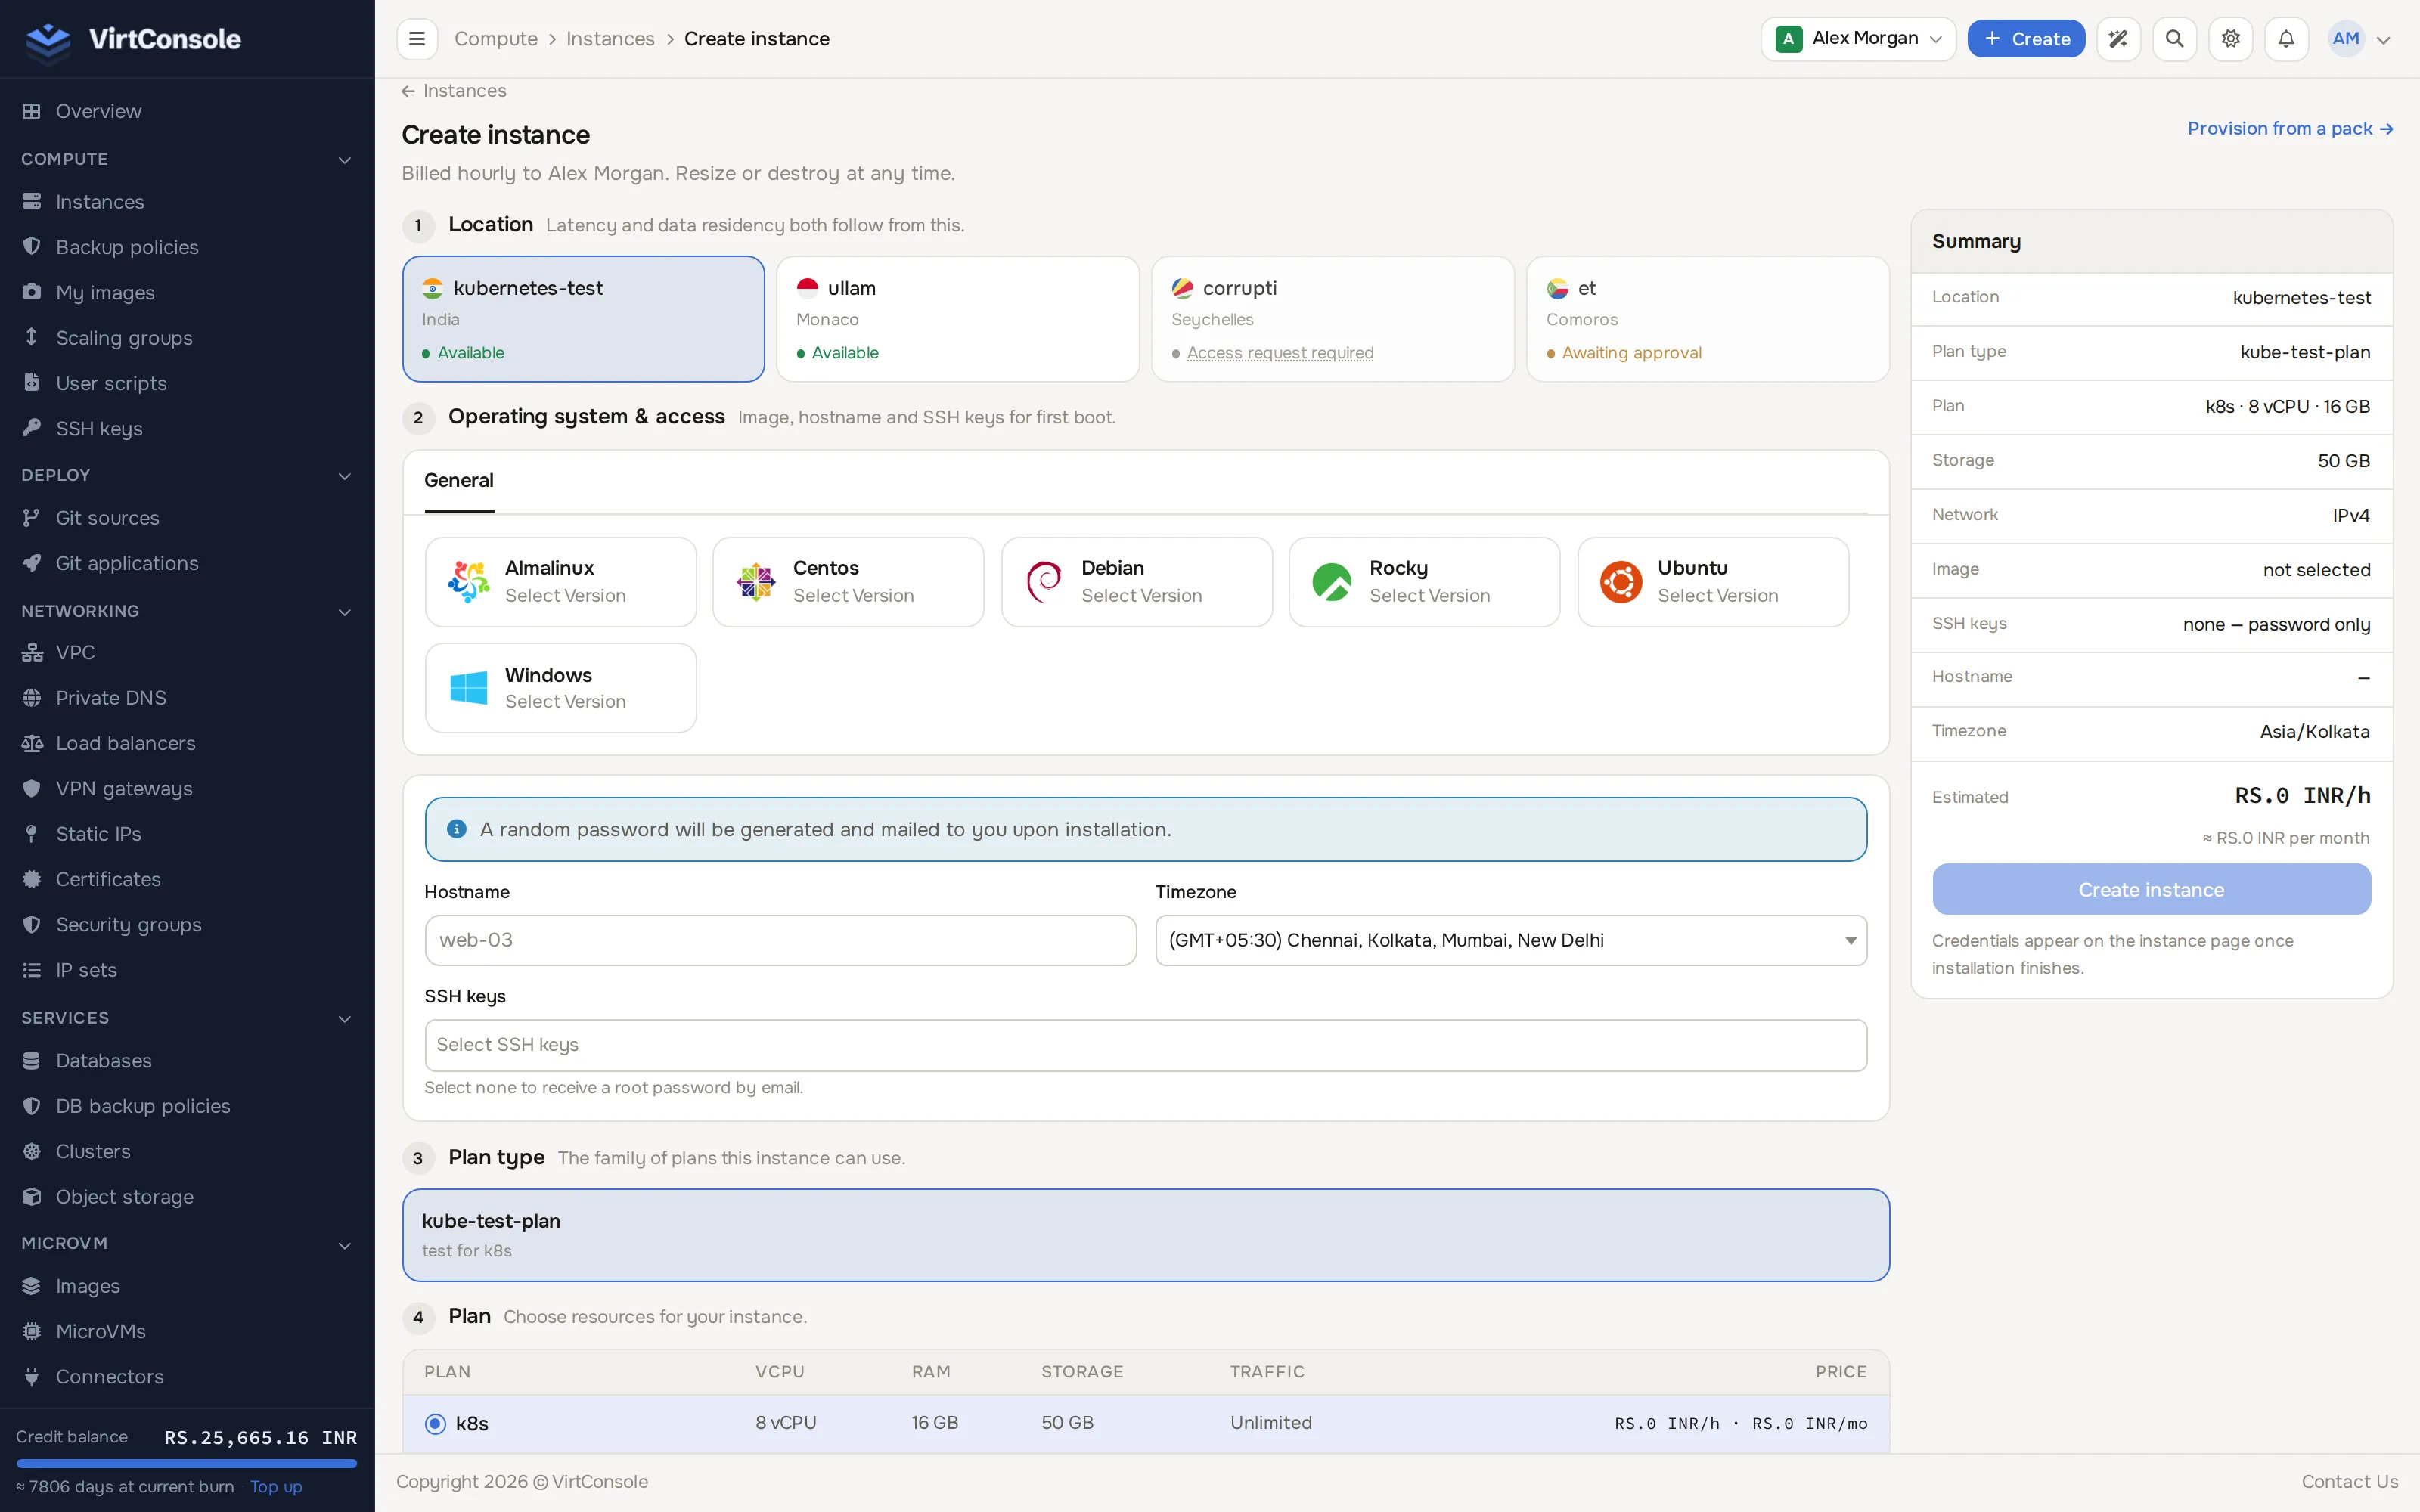
The instance is created immediately and you land on the Install page to finish choosing its operating system and access.
Self-Provisioning: carve an instance out of your pack
Section titled “Self-Provisioning: carve an instance out of your pack”Click Provision from a pack on the Create instance page, or go to Compute > Instances and use the same link. This opens Provision from your pack, a 5-step wizard:
-
Pack (pool and project): pick the Provisioning pack to spend from.
-
Resources (divide the pack): pick a Location, then use steppers to set CPU, Memory, Storage, Bandwidth and IP counts. Each value is capped by the pack’s per-instance maximum and by what is left in the pool.
-
OS & access (image and credentials): the same image, hostname, timezone, SSH key and cloud-init fields as the Cloud Service flow.
-
Network (VPC and addresses): optionally attach the instance to a VPC and subnet.
-
Review (pack impact): shows how the instance affects what remains in the pack. Click Create instance (the button re-checks every earlier step).
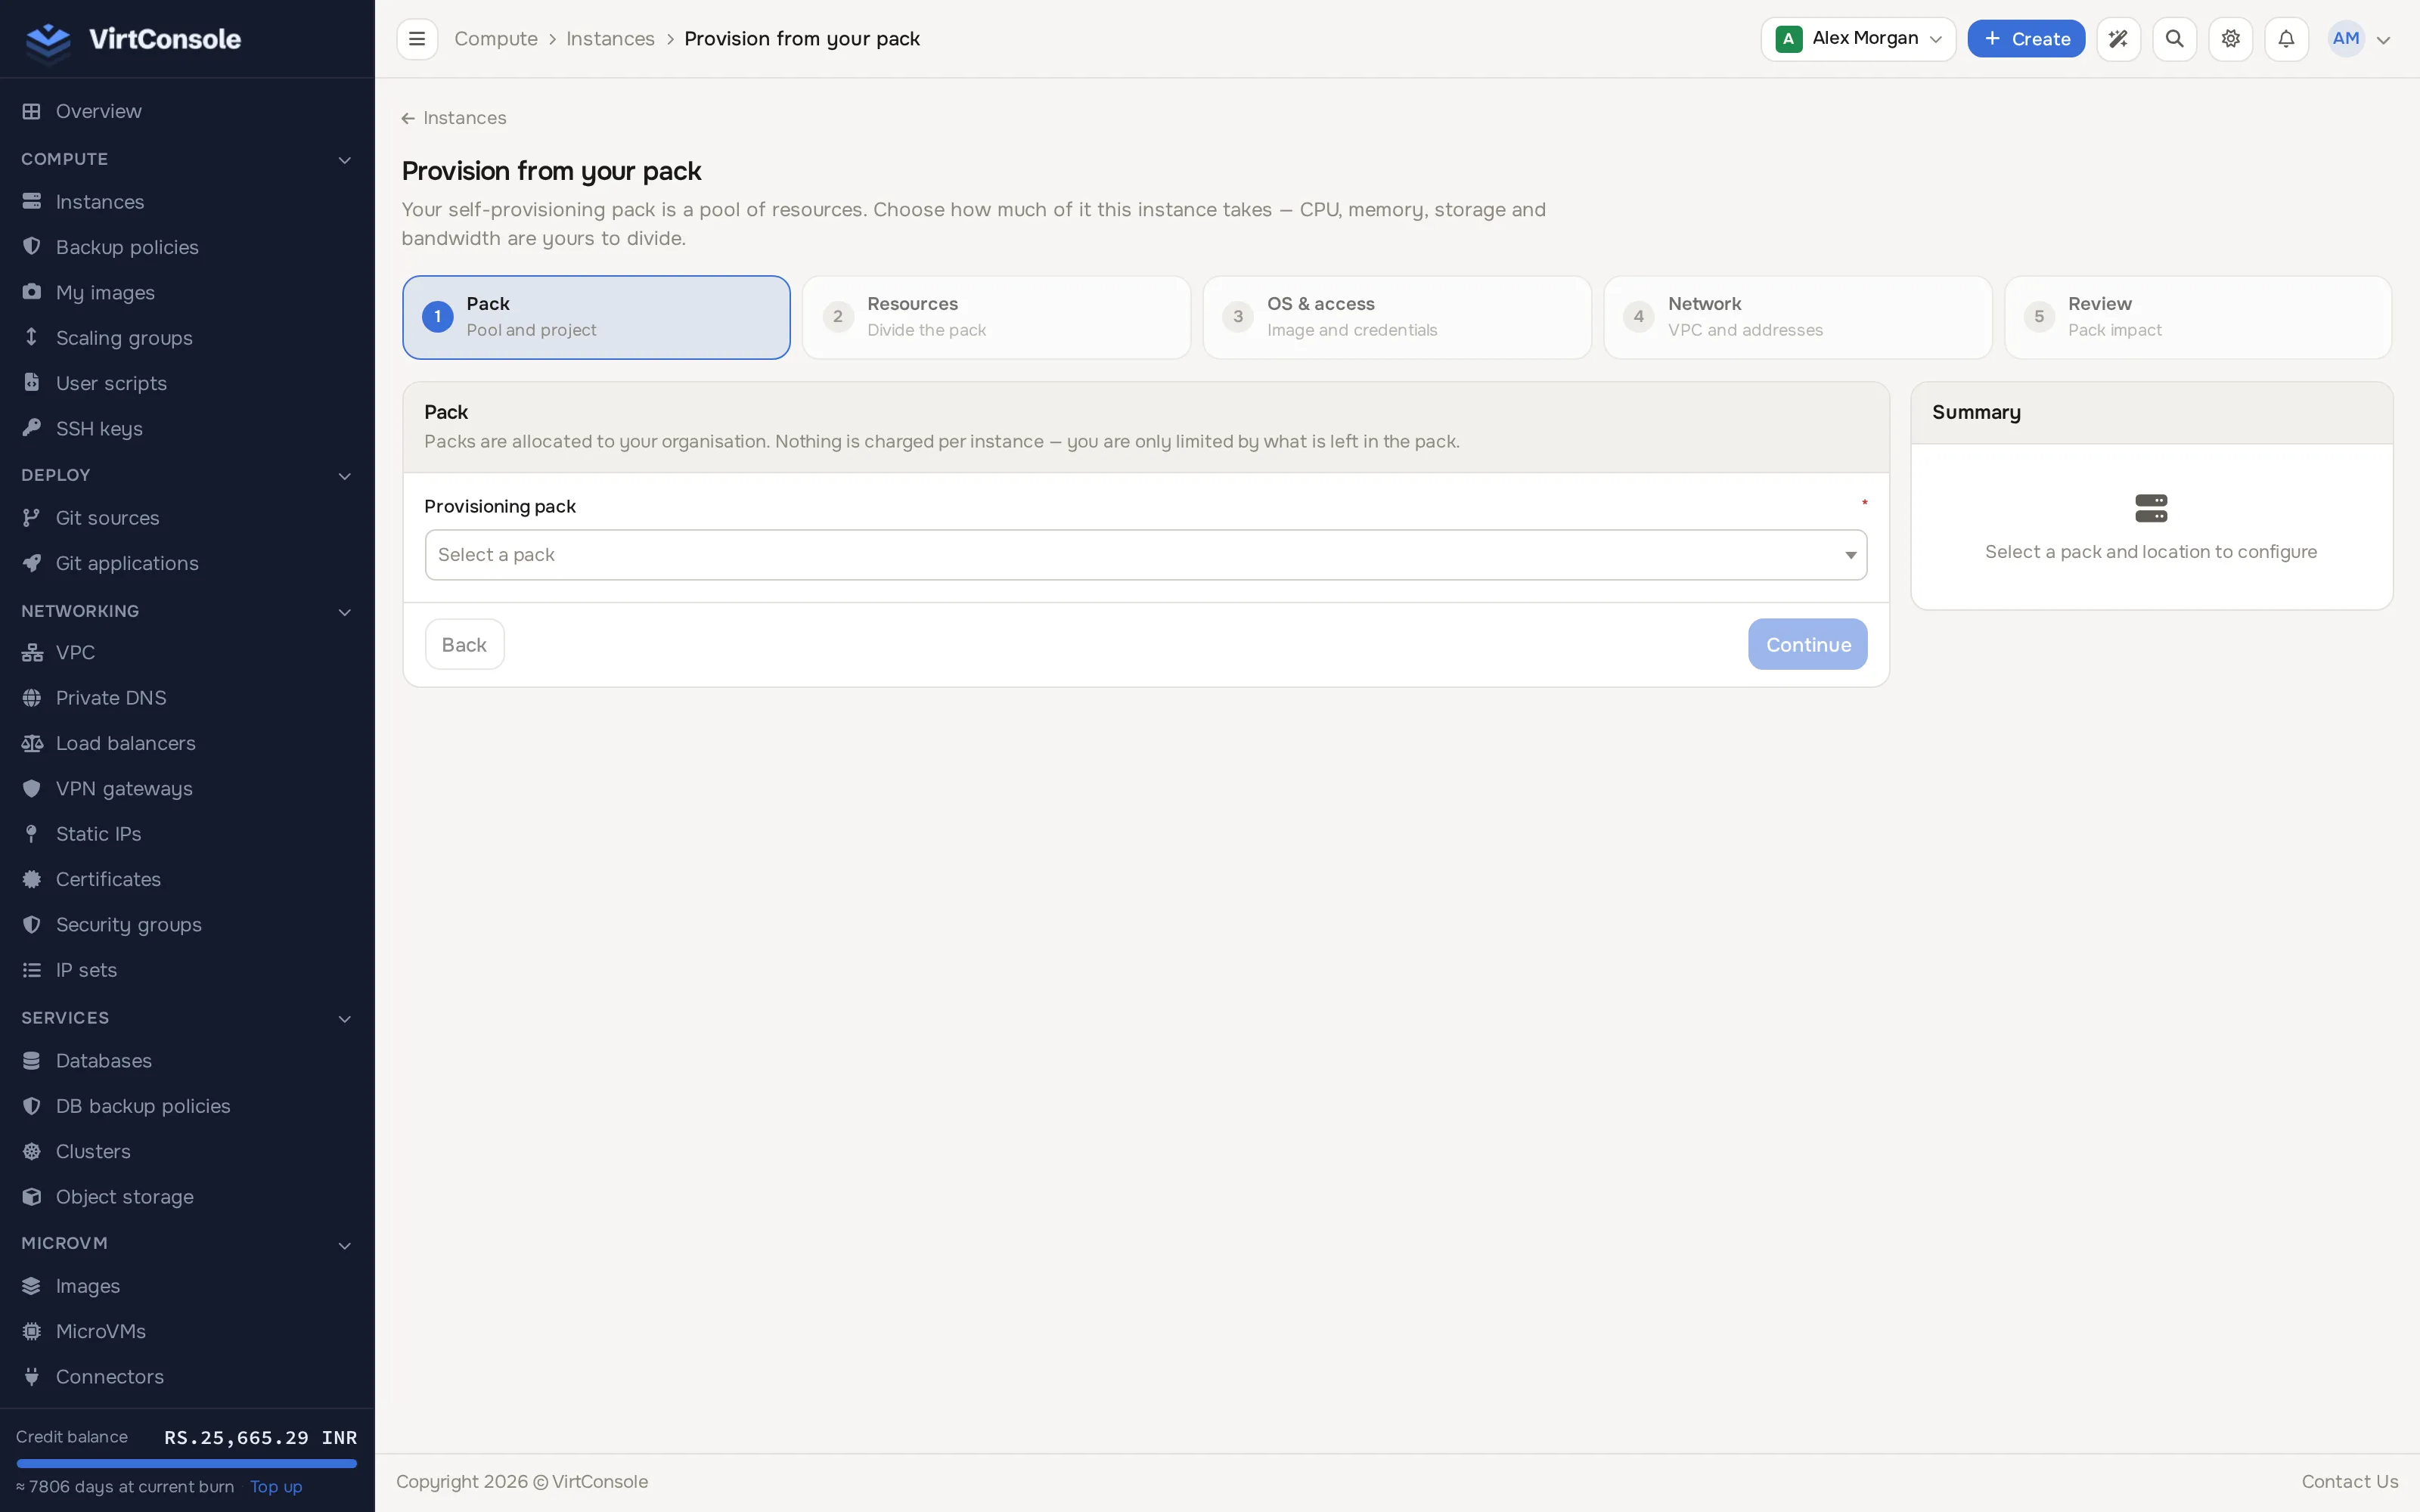
Creating the instance reserves the resources from your pack, then deploys the OS and access options you chose in step 3, all in one flow; there is no separate Install page for this path. You can change the image, hostname or access later from Reinstall. Destroying the instance later returns its resources to the pool, so you can spend them on a new one straight away.
Fixed plans: deploy what you already bought
Section titled “Fixed plans: deploy what you already bought”A fixed-plan instance is created for you when your order is processed, so there is nothing to pick in the panel. It shows up in Compute > Instances (and on the dashboard) with a Deploy button, which takes you to the same Install page described below.
Install the operating system
Section titled “Install the operating system”The Install page (used for a fixed-plan Deploy and for Reinstall) has the same Operating system & access fields as step 2 of the Cloud Service create page above, with a Summary card on the right.
- Click an OS logo and pick a version, or switch to My Images for a custom image.
- Enter a Hostname and pick a Timezone.
- For Linux cloud-init images, select SSH keys, optionally tick Install Docker Engine & Docker Compose, and optionally add scripts or cloud-init User data.
- Click Deploy instance.
If you plan to install the OS yourself instead of picking an image (for example booting your own ISO), click Self Install in the page header. This skips the image catalog and deploys the instance with no OS attached, ready for you to install manually from the console. Cancel Reinstallation in the same header backs out of a reinstall before deploying.
What happens next
Section titled “What happens next”The instance page switches to a live deploy log with a progress bar. Provisioning takes a few minutes. When it finishes, the panel emails you a randomly generated root or Administrator password, and the instance appears in Compute > Instances as running. Open it and click Manage to reach the console, power actions, networking, backups and more.
Common problems
Section titled “Common problems”- “No Locations available!” Your provider has not opened any location to your account for Cloud Service. Contact your provider.
- “No Plan Types available at this Location!” The location has no plan groups published for customers. Pick another location or contact your provider.
- “No Plans available in this Plan Type!” The plan group is empty in this location. Pick another group or location.
- “Cloud Service is not enabled!” Your account is not on Cloud Service billing. If you expected hourly billing, contact your provider.
- “No resources found for deployment, please contact support!” You have no Self-Provisioning pack assigned. Contact your provider.
- A location is locked with “Awaiting approval”. You already requested access and your provider has not approved it yet.
- Deploy fails with an insufficient-balance error. Your credit balance cannot cover the instance. Click Add credit on the Billing page and try again.