

Enable MicroVMs
MicroVMs need several independent pieces set up before a customer can create one: at least one node running the engine, a hypervisor group offering MicroVMs, a synced base image catalog, plans mapped to that group, and a network for MicroVMs to reach. The Readiness page checks all of it in one place.
Where to find it
Section titled “Where to find it”In the admin panel go to MicroVM > Readiness.
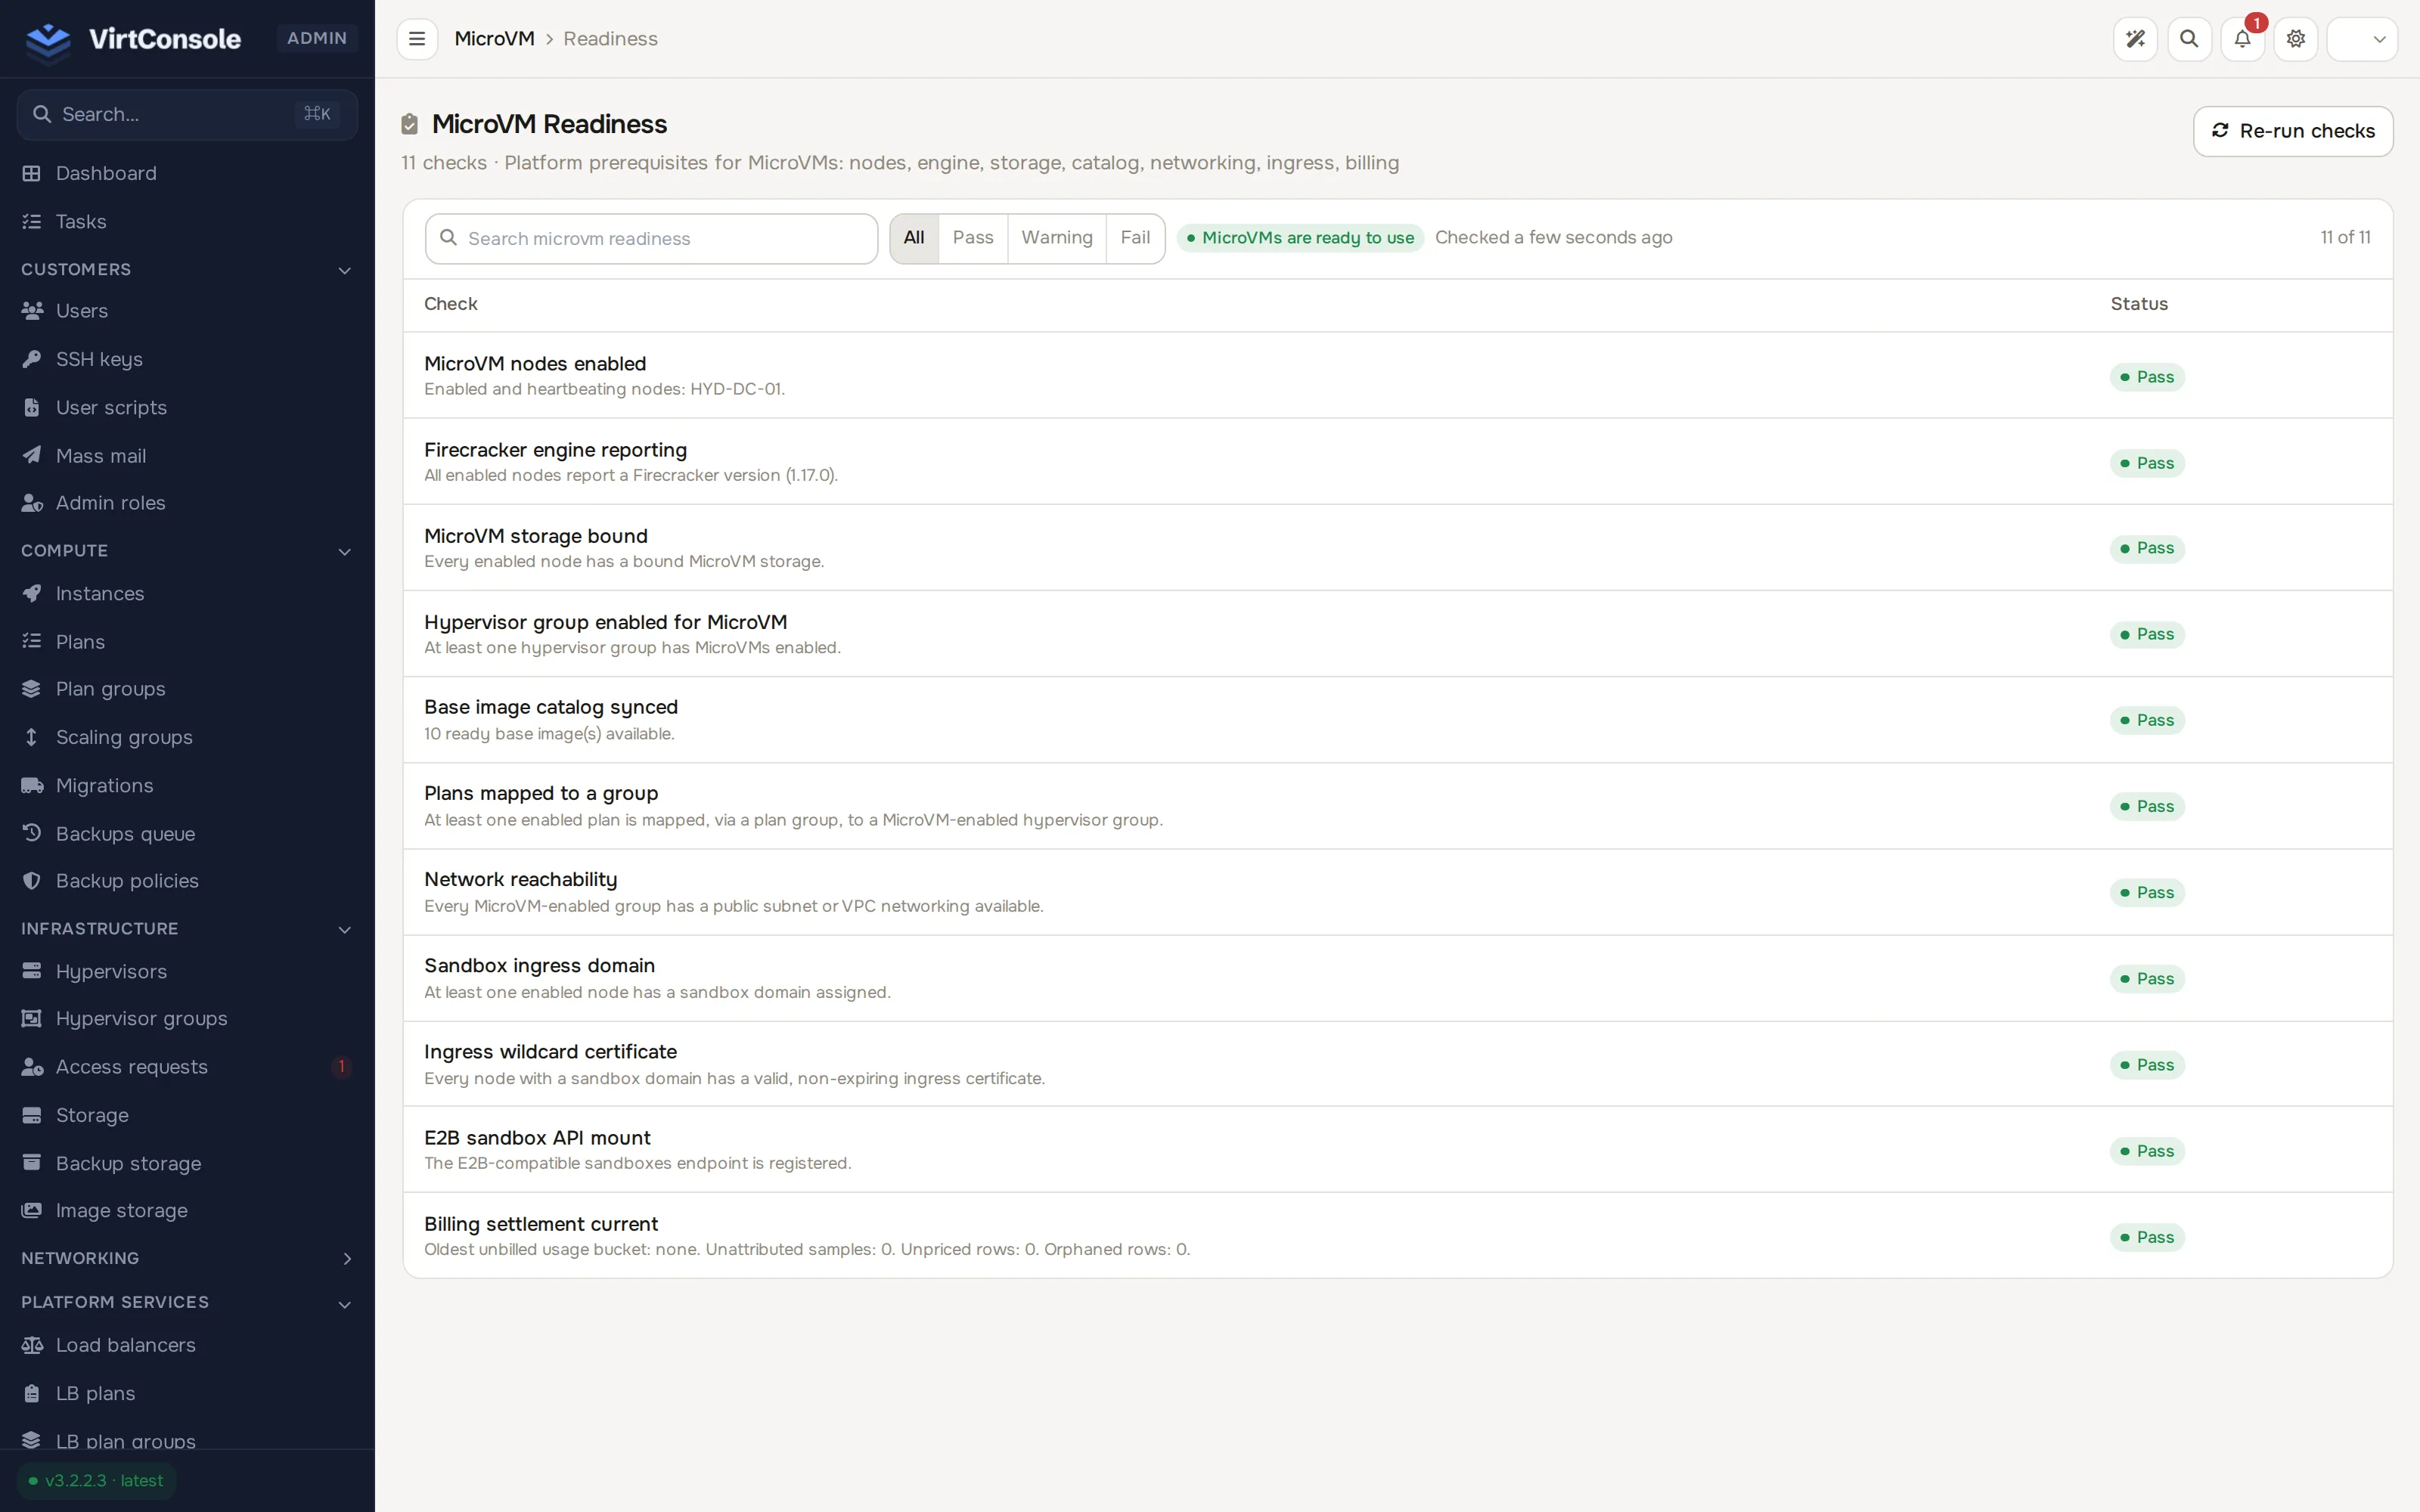
Each row shows a check, its status (pass, warn or fail) and, when a check needs action, a Fix link straight to the page that resolves it. The banner at the top reads MicroVMs are ready to use only when every check passes, Partially ready when only warnings remain, and Not ready when any check fails. Click Re-run checks after making a change; the summary is cached for a minute.
The list covers 11 checks in total. Most are walked through below in setup order; MicroVM storage bound and Network reachability are the same storage and network requirements from steps 1 and 5, and Billing settlement current is an internal health check on the usage-billing pipeline, not a setting you configure here.
1. Enable the MicroVM engine on a node
Section titled “1. Enable the MicroVM engine on a node”A hypervisor needs the engine running before it can host any MicroVM.
- Go to Compute > Hypervisors and open a node that has the VirtConsole agent installed.
- Click the MicroVM tab.
- On the MicroVM Engine card, turn on the Enable Engine toggle in the card header. This requires
hypervisor-microvmdto already be provisioned and running on the node; see MicroVM nodes if it is not. - Set Reserved vCPUs and Reserved RAM: ceilings the MicroVM placement scheduler never exceeds on this node, independent of any full-KVM instance capacity above. Reserved Disk (optional cap) does the same for disk.
- Pick a MicroVM Storage pool: only assigned, file-backed local or directory storage can host Firecracker rootfs and state files; other pools show why they are not eligible. The card also shows the State directory in use once a storage is bound.
- Set the Public IP (ingress): the node’s own public IPv4 address, the one its default route leaves through and that the internet can reach on ports 80 and 443. The engine’s HTTP/HTTPS ingress proxy listens on that address, and the panel publishes it as the DNS A record for the sandbox wildcard (
*.sb-<node>.<sandbox domain>) and for every custom app domain, so the two must match. Do not enter a customer subnet or static-pool IP, a VPC or bridge address, or a NATed or Cloudflare-proxied address. On the node,ip route get 1.1.1.1shows the address the engine picked (src), andjournalctl -u hypervisor-microvmd | grep 'ingress: listening'confirms what it bound. If the default-route address is not the one you want, setMICROVMD_INGRESS_ADDR=<ip>in the engine’s systemd environment, restart it, and enter the same value here. Leaving the field empty disables ingress DNS for the node and the Readiness page keeps warning. - Click Save MicroVM Settings.
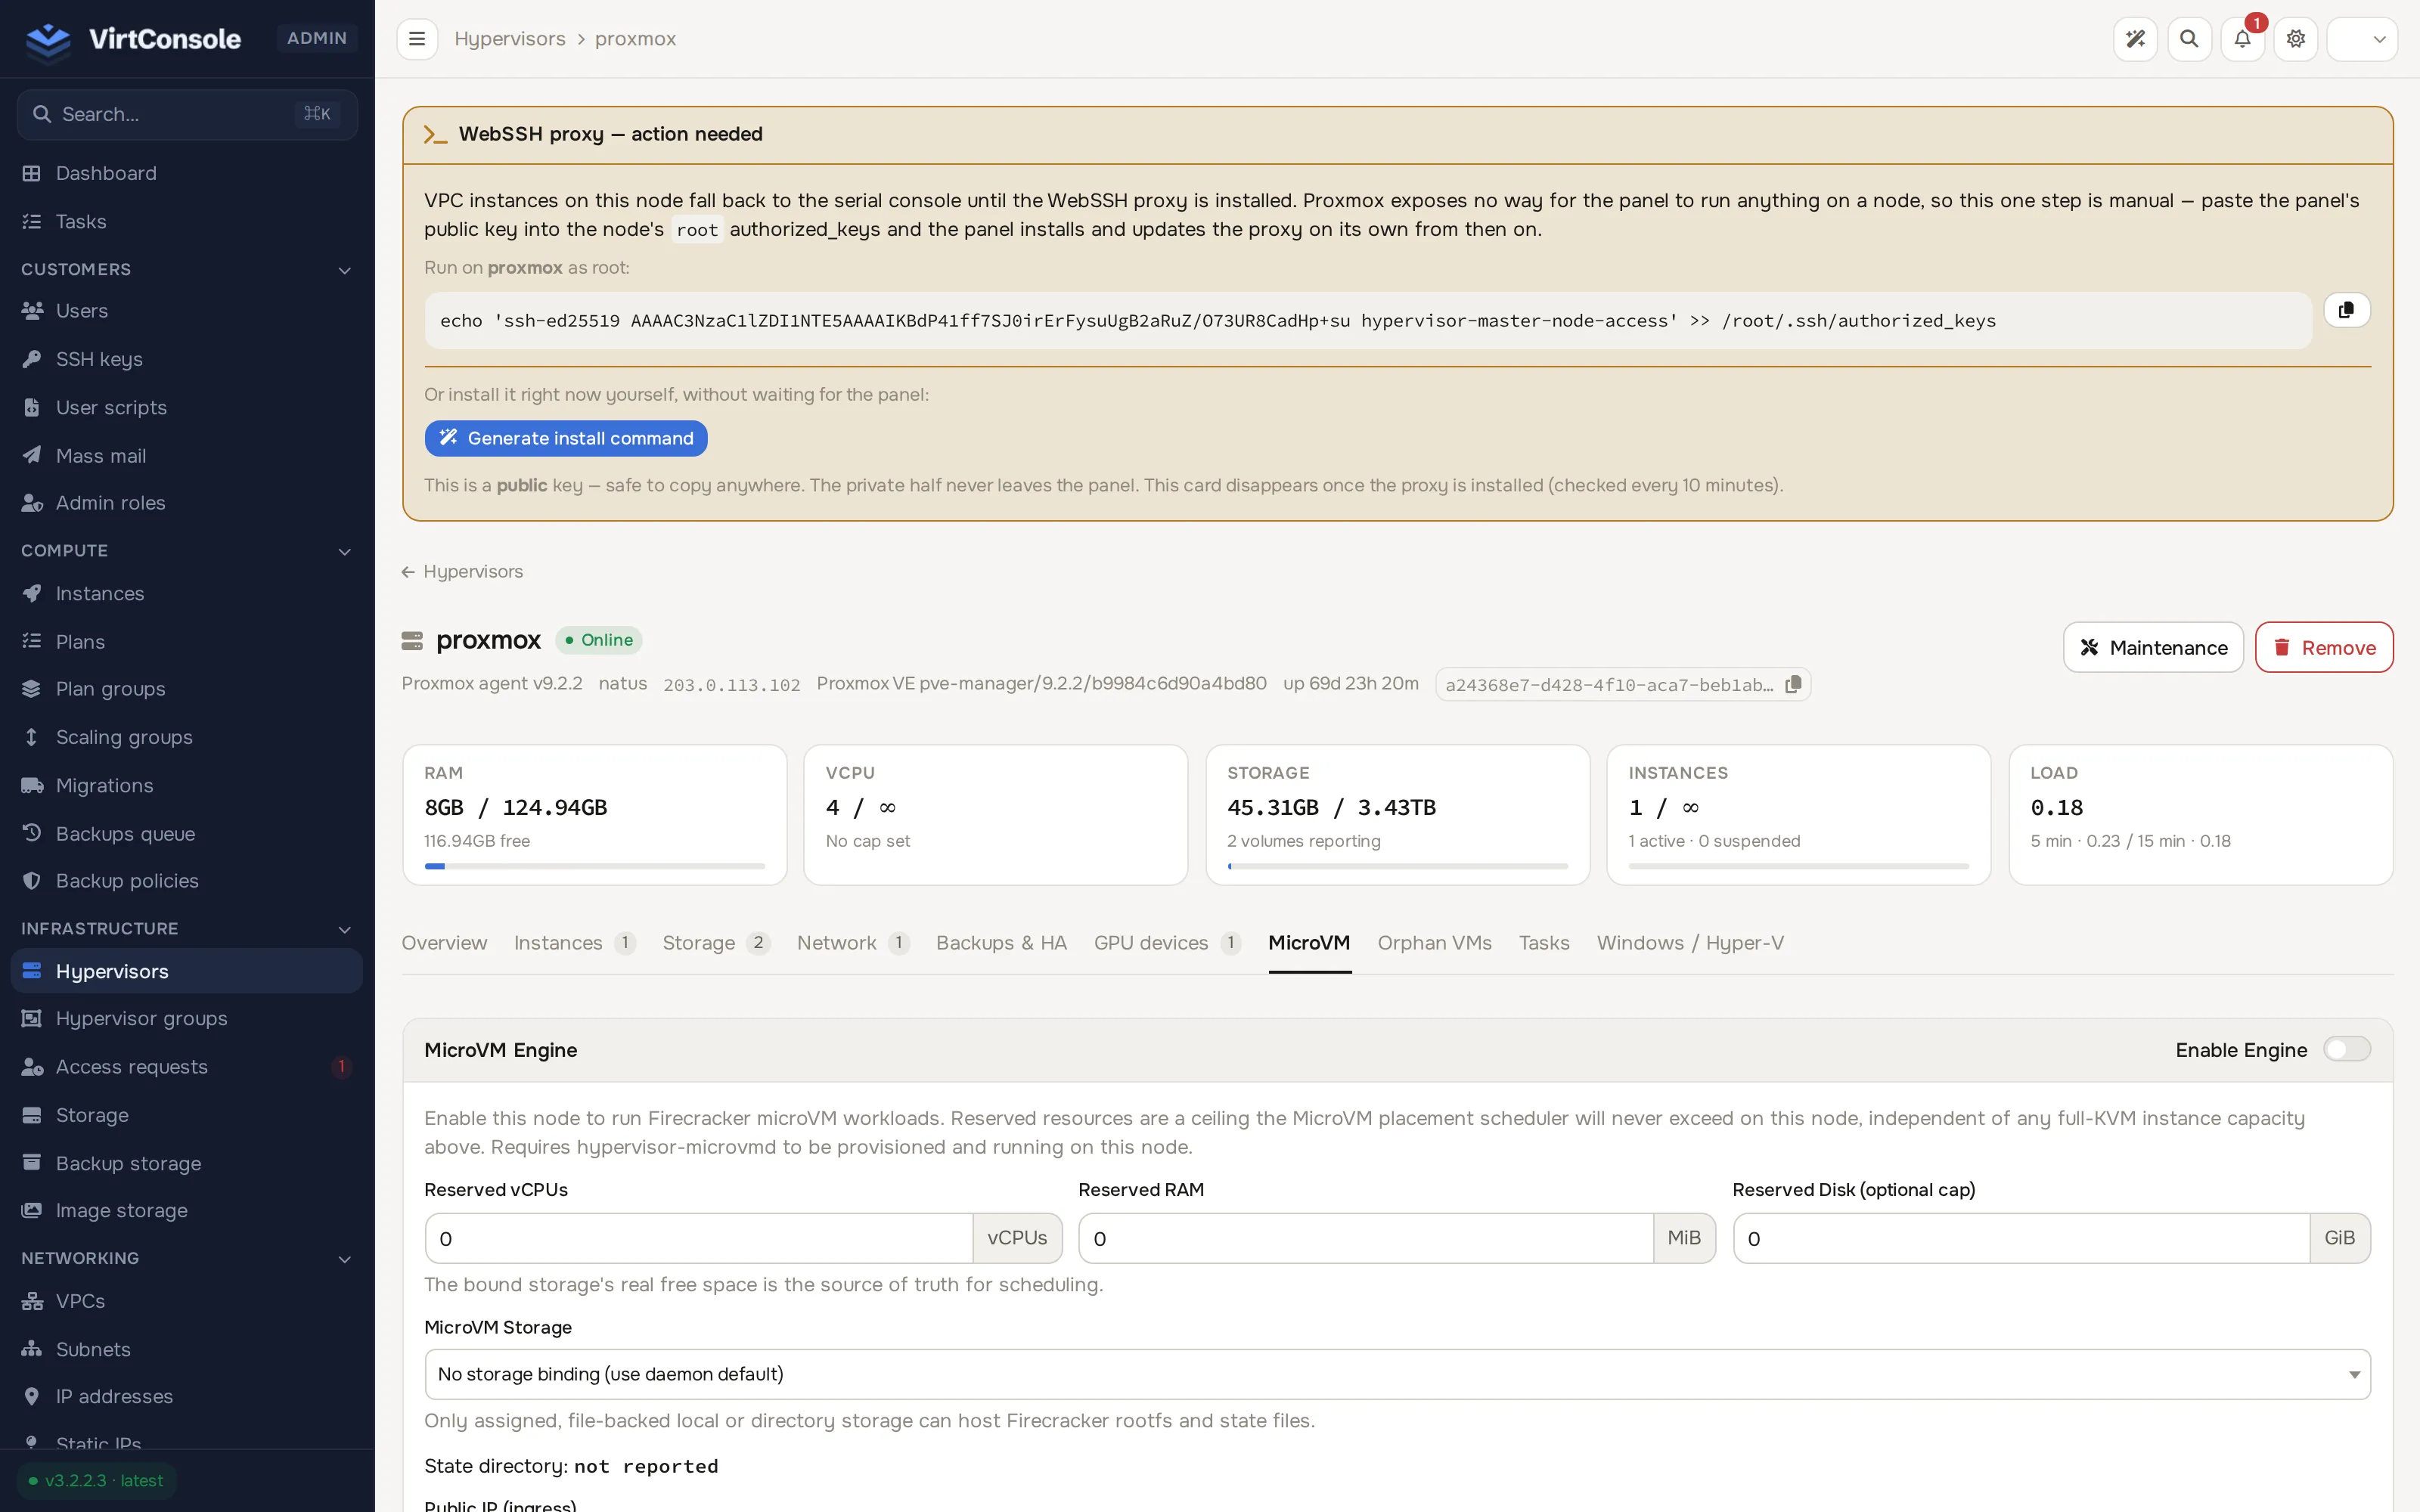
The Readiness page’s MicroVM nodes enabled and Firecracker engine reporting checks pass once at least one node is enabled and has sent a heartbeat within the last 5 minutes.
2. Enable MicroVMs on a hypervisor group
Section titled “2. Enable MicroVMs on a hypervisor group”- Go to Compute > Hypervisor Groups and open the group you want to offer MicroVMs in.
- Click the Compute tab.
- On the MicroVMs card, turn on the Enabled toggle, then click Save group.
This is the same on/off pattern as managed databases or load balancers on a group: it decides whether the group offers MicroVMs at all, separately from which accounts may deploy into it. The Hypervisor group enabled for MicroVM check passes once at least one enabled group has this on.
3. Sync the base image catalog
Section titled “3. Sync the base image catalog”- Go to MicroVM > Images.
- Click Sync base catalog.
This pulls the platform’s signed base image manifest and creates or updates the platform base images (sandbox-base, app-base, runner-base, builder) that every account can build from. The Base image catalog synced check passes once at least one is ready, and warns if the catalog has not changed in over 7 days.
4. Map plans to the group
Section titled “4. Map plans to the group”- Go to MicroVM > Plans and make sure at least one plan is enabled. See Plans and plan groups.
- Go to MicroVM > Plan groups, open or create a plan group, and add the hypervisor group as one of its locations.
The Plans mapped to a group check passes once an enabled plan, through a plan group, reaches a MicroVM-enabled hypervisor group.
5. Give the group a network
Section titled “5. Give the group a network”Each MicroVM-enabled group needs either a public subnet attached to its hypervisors, or VPC networking enabled for the group; otherwise a MicroVM placed there has no reachable network at all. See Hypervisor groups and VPC.
6. Sandbox domain and ingress certificate
Section titled “6. Sandbox domain and ingress certificate”The Sandbox ingress domain and Ingress wildcard certificate checks only warn, they never fail the overall setup: the same-host E2B API (/api/e2b) works without either. Without a sandbox domain, though, the E2B SDK’s command and file operations and HTTPS ingress into a MicroVM’s own hostname are unavailable, and customers see this explained on their API Keys page.
7. Confirm the API mount
Section titled “7. Confirm the API mount”The E2B sandbox API mount check confirms GET /api/e2b/sandboxes is registered. It should always pass on a standard install; a fail here means the application’s route cache is stale or the E2B routes were not loaded, and needs an operator to investigate rather than a panel setting.
What happens next
Section titled “What happens next”Once every check passes, an eligible account sees the location in its MicroVM create wizard and can build images and create MicroVMs. A partial status still lets customers create MicroVMs; only the warned capabilities (SDK command/file access, HTTPS ingress) are unavailable until you resolve them.
Common problems
Section titled “Common problems”- A node stays at “warn” for heartbeat. The engine is enabled but
hypervisor-microvmdis not reporting; checksystemctl status hypervisor-microvmdon the node. See MicroVM nodes. - “No enabled node to check yet” on the Firecracker engine check. Complete step 1 first; this check depends on it.
- Plans mapped fails even though a plan group exists. The plan group’s plans are all disabled, or none of its locations are MicroVM-enabled hypervisor groups.