

Subnets and IP addresses
A subnet is a block of IP addresses with a gateway, netmask, and networking mode. Every IP handed to an instance comes from a subnet, so subnets are one of the first things you add after connecting a hypervisor.
Before you begin
Section titled “Before you begin”- At least one hypervisor connected. See Add a hypervisor.
- Host-side networking prepared for the mode you plan to use. See Networking modes.
- Optional: an rDNS zone if you want automatic PTR records. See Reverse DNS.
Where to find it
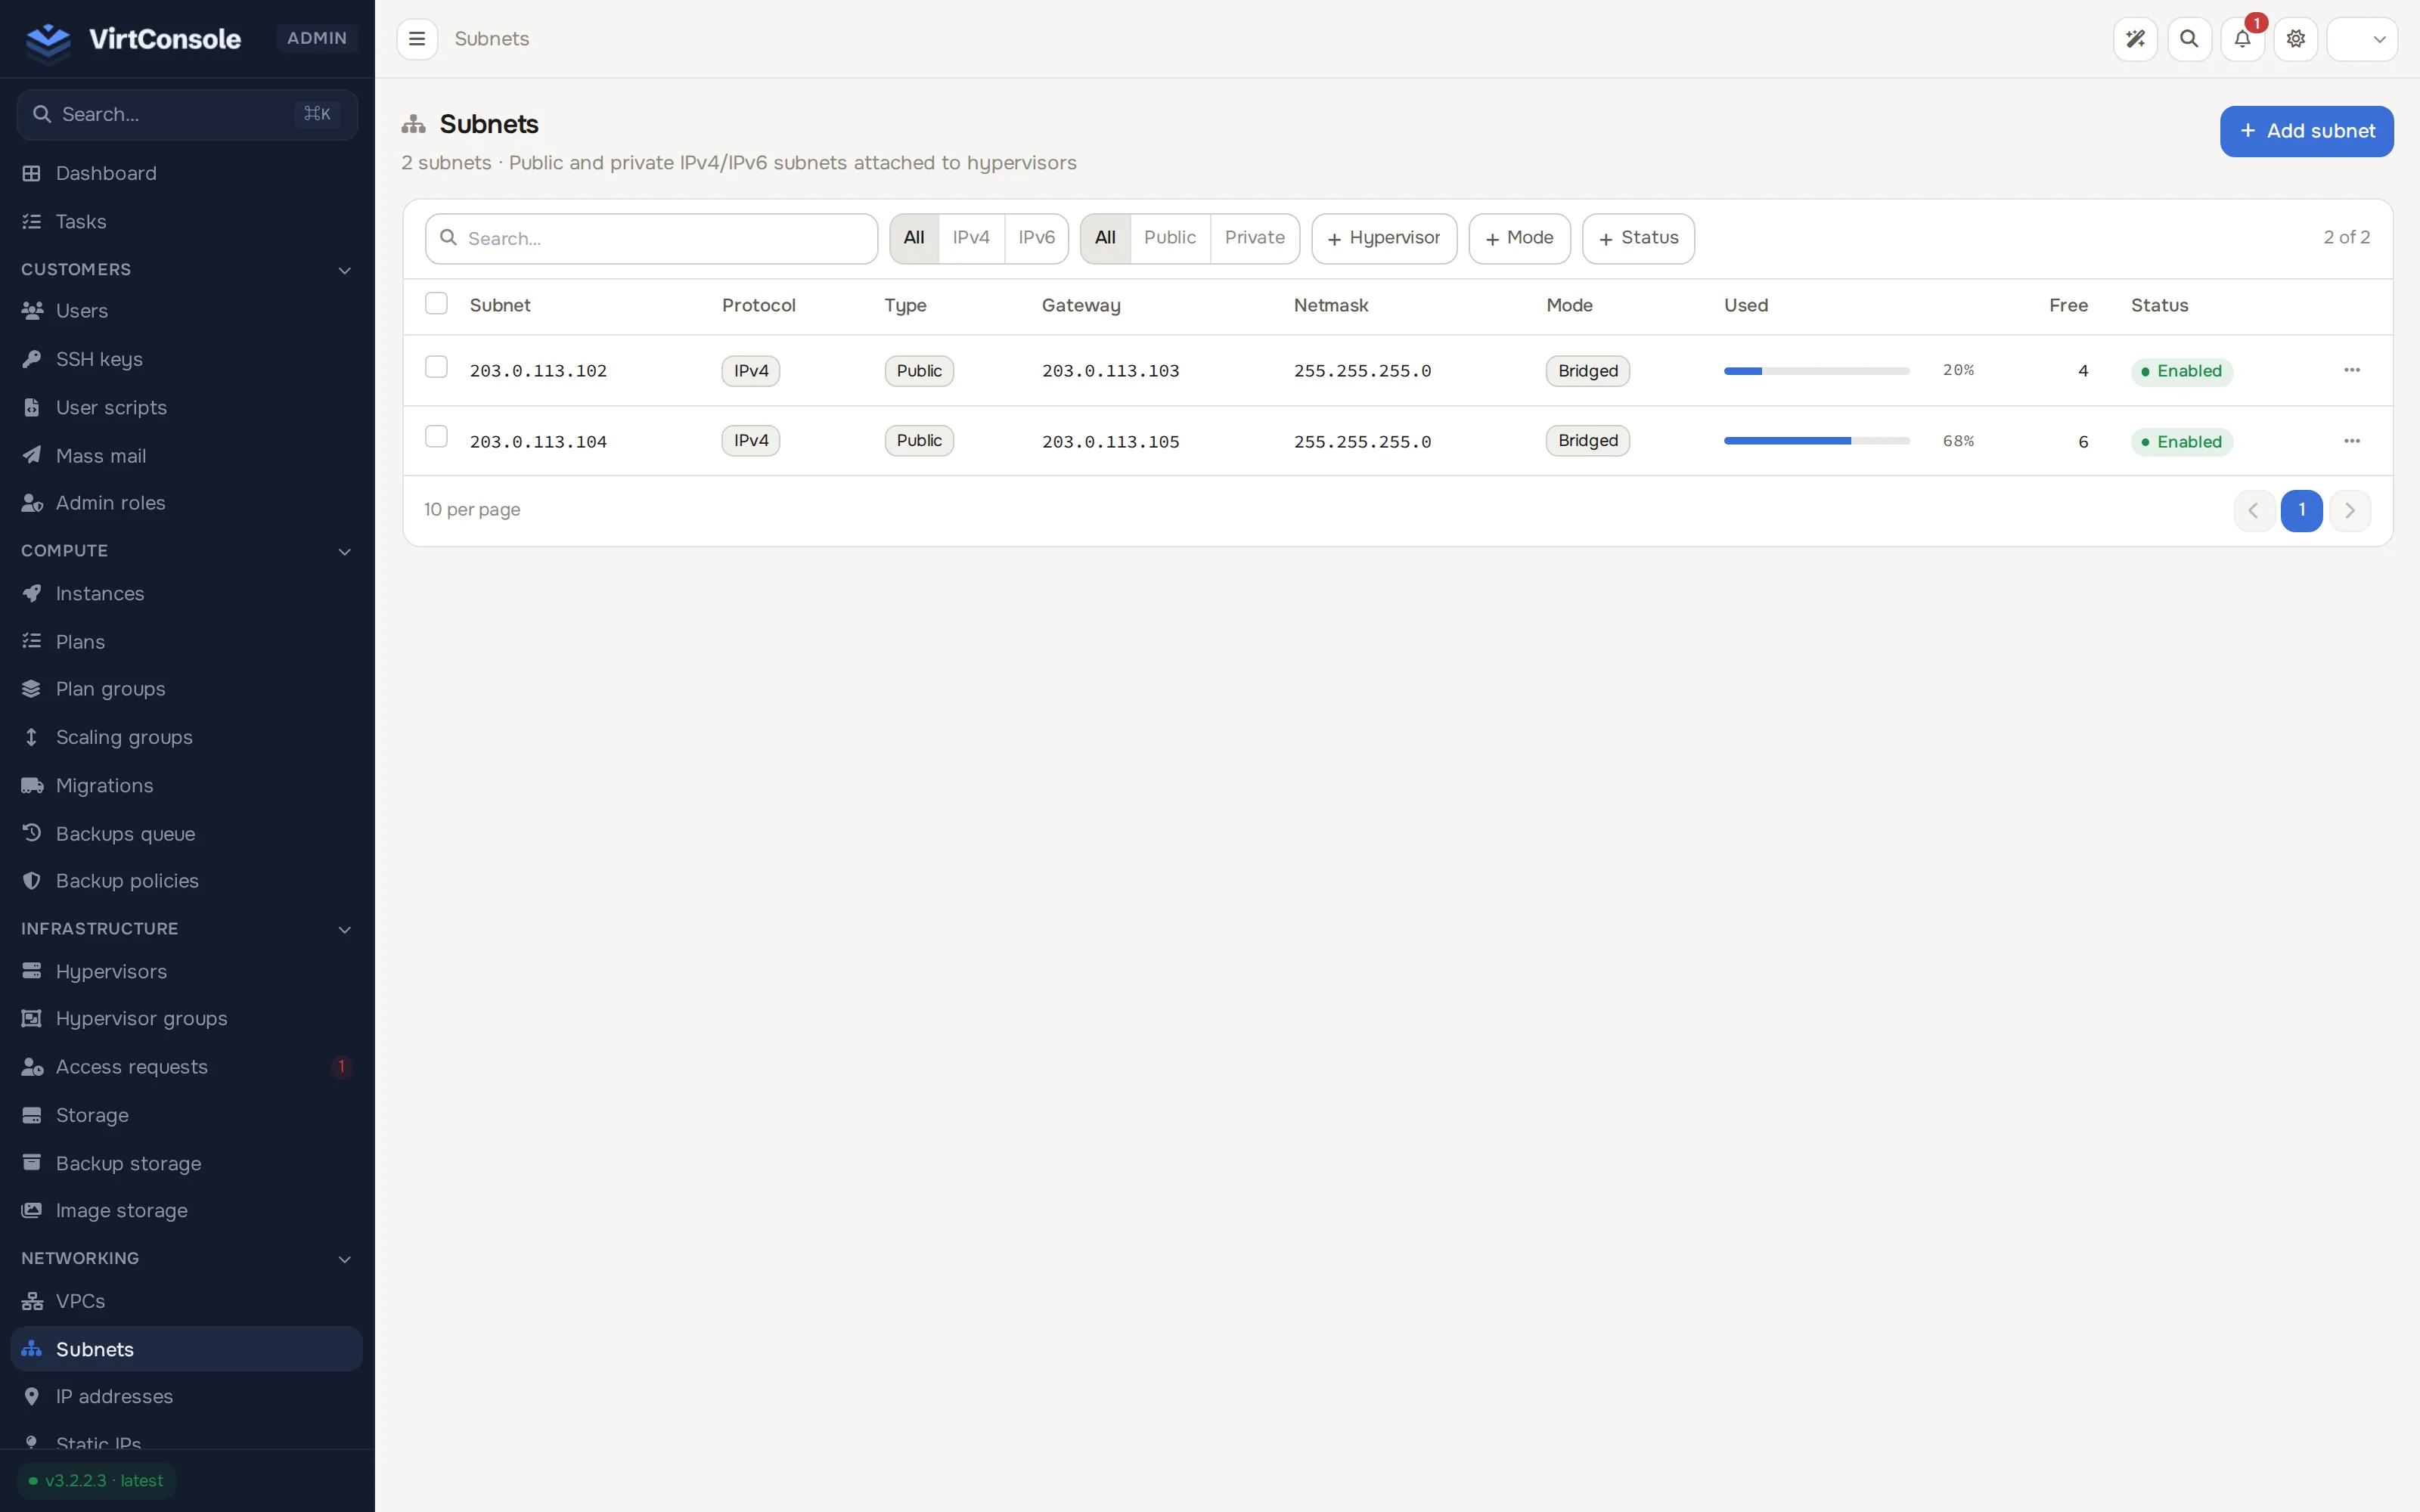
Section titled “Where to find it”In the admin panel go to Networking > Subnets. The list shows every subnet with its netmask, gateway, usage, mode, type, protocol, and status.
Create a subnet
Section titled “Create a subnet”-
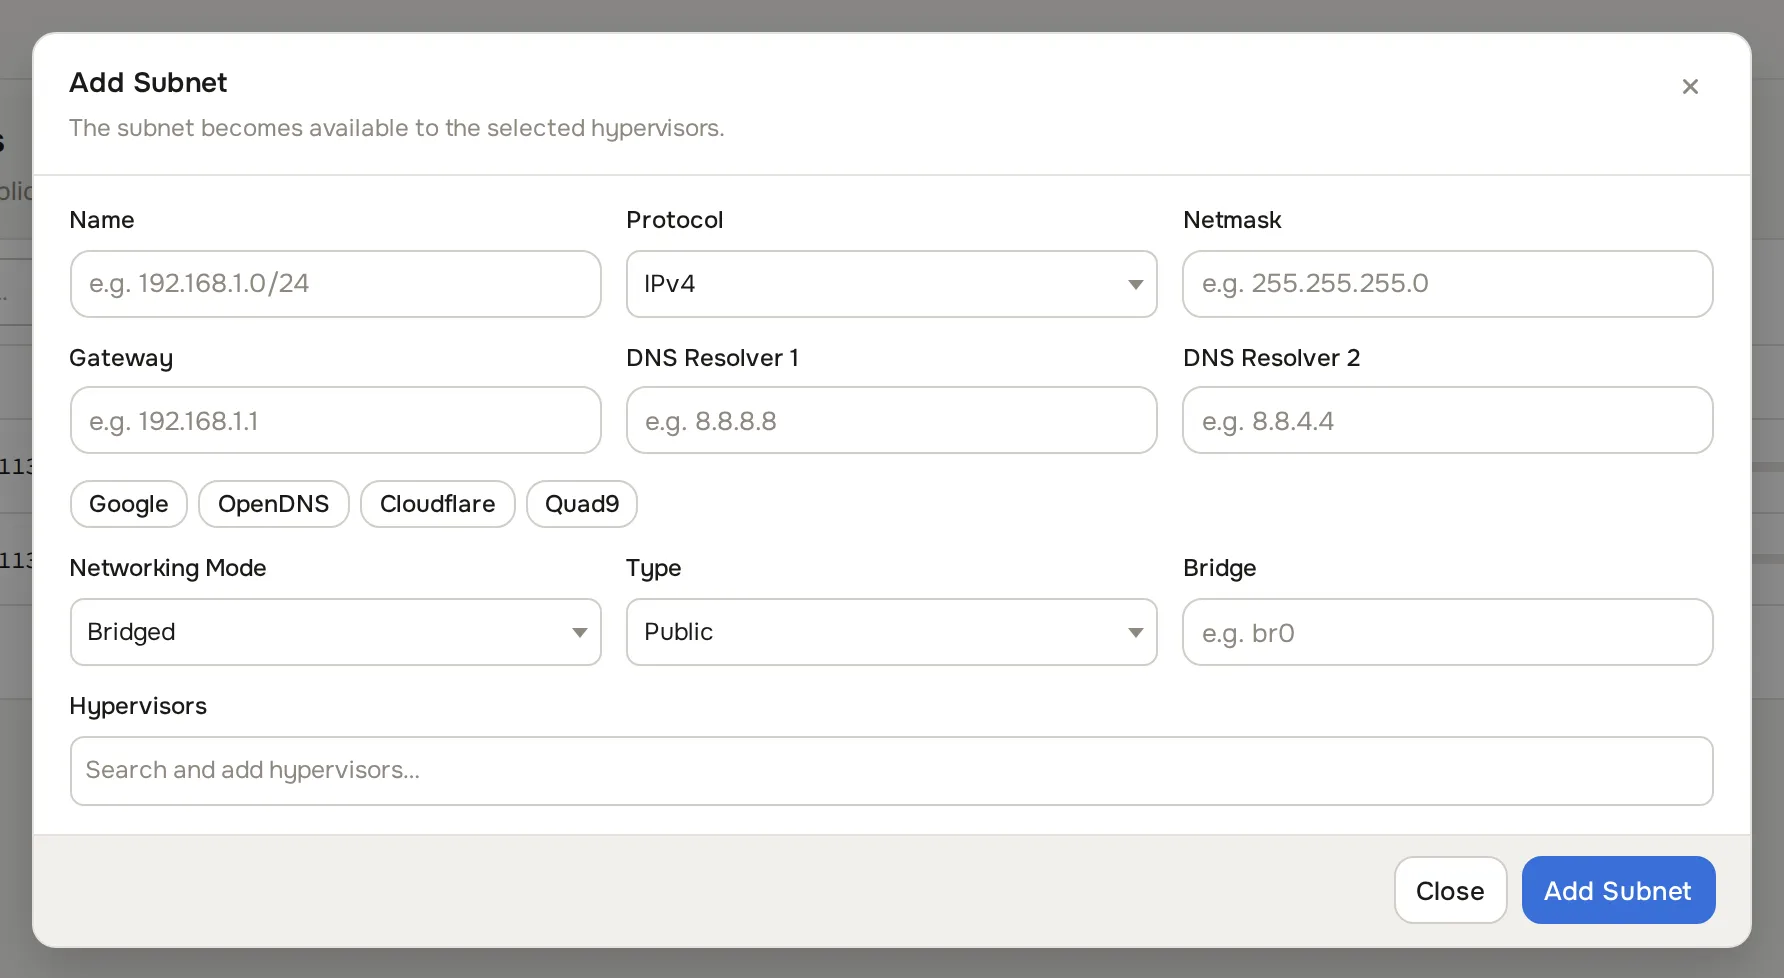
Click Add subnet. The Add Subnet dialog opens.
-
Fill in the fields:
Fields
| Field | What to enter |
|---|---|
| Name | A label you will recognise in lists, for example ipv4-pool-1. |
| Protocol | IPv4 or IPv6. IPv6 is not available for private subnets. |
| Netmask | IPv4: a dotted netmask such as 255.255.255.0. IPv6: the routed prefix length (the label changes to Netmask (Routed IPv6 Prefix)). |
| Gateway | The gateway address from your network provider, for example 203.0.113.1. |
| DNS Resolver 1 / DNS Resolver 2 | The resolvers handed to instances. The Google, OpenDNS, Cloudflare, and Quad9 buttons fill both fields for the selected protocol. |
| Networking Mode | Bridged, NAT, or Routed. See Networking modes. |
| Type | Public or Private. |
| Interface | The host interface NAT traffic egresses through. Shown only for NAT mode. |
| Bridge | The bridge on the hypervisor, for example br0. Shown only for Bridged and Routed modes. |
| Hypervisors | One or more hypervisors that can deploy into this subnet. |
- Click Add Subnet.
The panel opens the subnet’s detail page, where you edit the subnet and generate its IPs.
Create a private subnet
Section titled “Create a private subnet”Private networking lets instances talk over internal addresses without touching the public internet. It uses ordinary subnets with Type set to Private and an RFC1918 range (10.0.0.0/8, 172.16.0.0/12, 192.168.0.0/16), plus a secondary interface on each instance.
- Create a subnet as above, with Type set to Private.
- In Hypervisors, select every hypervisor whose instances should share the network. If a VLAN connects your hypervisors on the private network, select all of them. Otherwise select only one.
- Generate the address range (next section).
Customers then add a secondary interface on their instance, and the panel assigns an IP from this pool. For a fully isolated network with its own subnets, NAT, and VPN, use VPCs instead. See VPCs.
Generate IP addresses
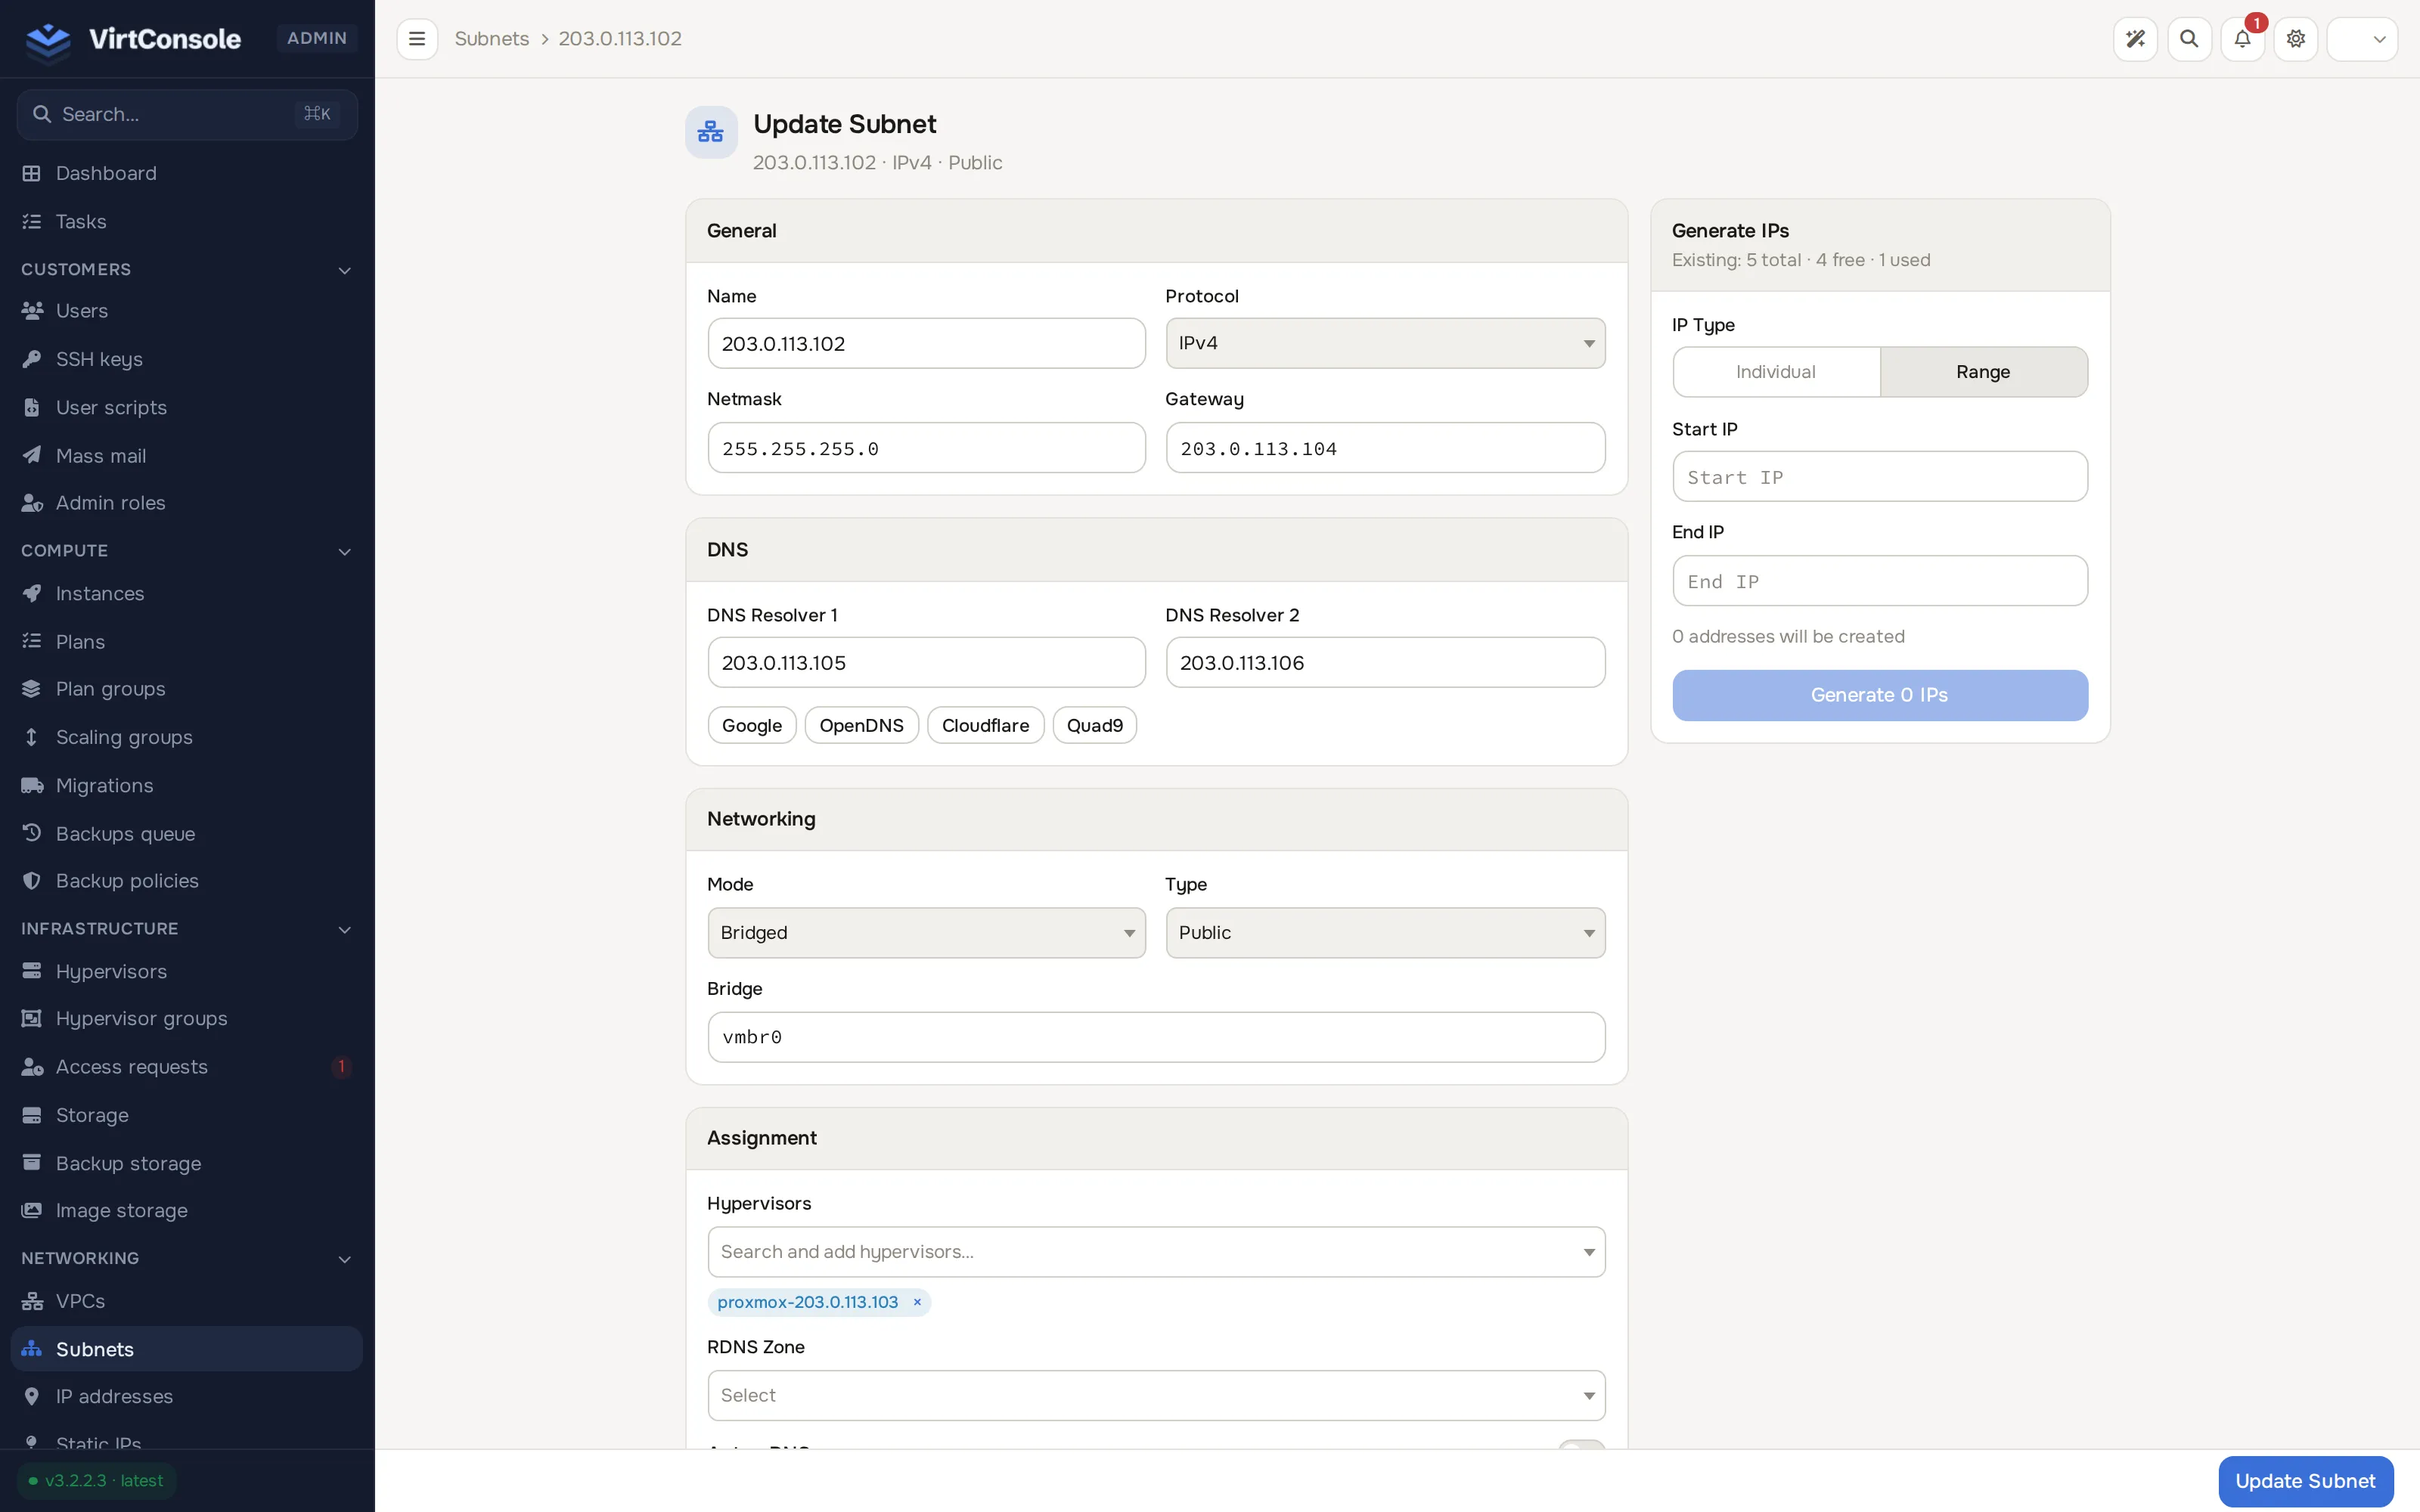
Section titled “Generate IP addresses”IPs are generated from the subnet’s own page, not from the IP addresses list (which has its own smaller add shortcut, see below).
-
Open the subnet (click its row on Networking > Subnets). The Generate IPs card sits in the right column, showing existing totals (free/used).
-
Pick an IP Type. The choices depend on the subnet’s protocol:
IP Types
| Protocol | IP Type | Fields |
|---|---|---|
| IPv4 | Individual | Repeatable IP / MAC (optional) rows. Click Add another IP for more rows. |
| IPv4 | Range | Start IP and End IP. The panel fills in every address between them and shows the resulting count. |
| IPv6 | IPv6 | Count of single addresses to mint. |
| IPv6 | IPv6 Subnets | Generate Netmask (48, 64, 80, 96, or 112) and Count. Each subnet can be handed to one instance. |
- Click Generate N IPs (the button’s label updates live with the count you are about to create).
Set a MAC on individual IPs when your upstream provider locks IPs to MAC addresses, as Hetzner does.
Manage the IP list
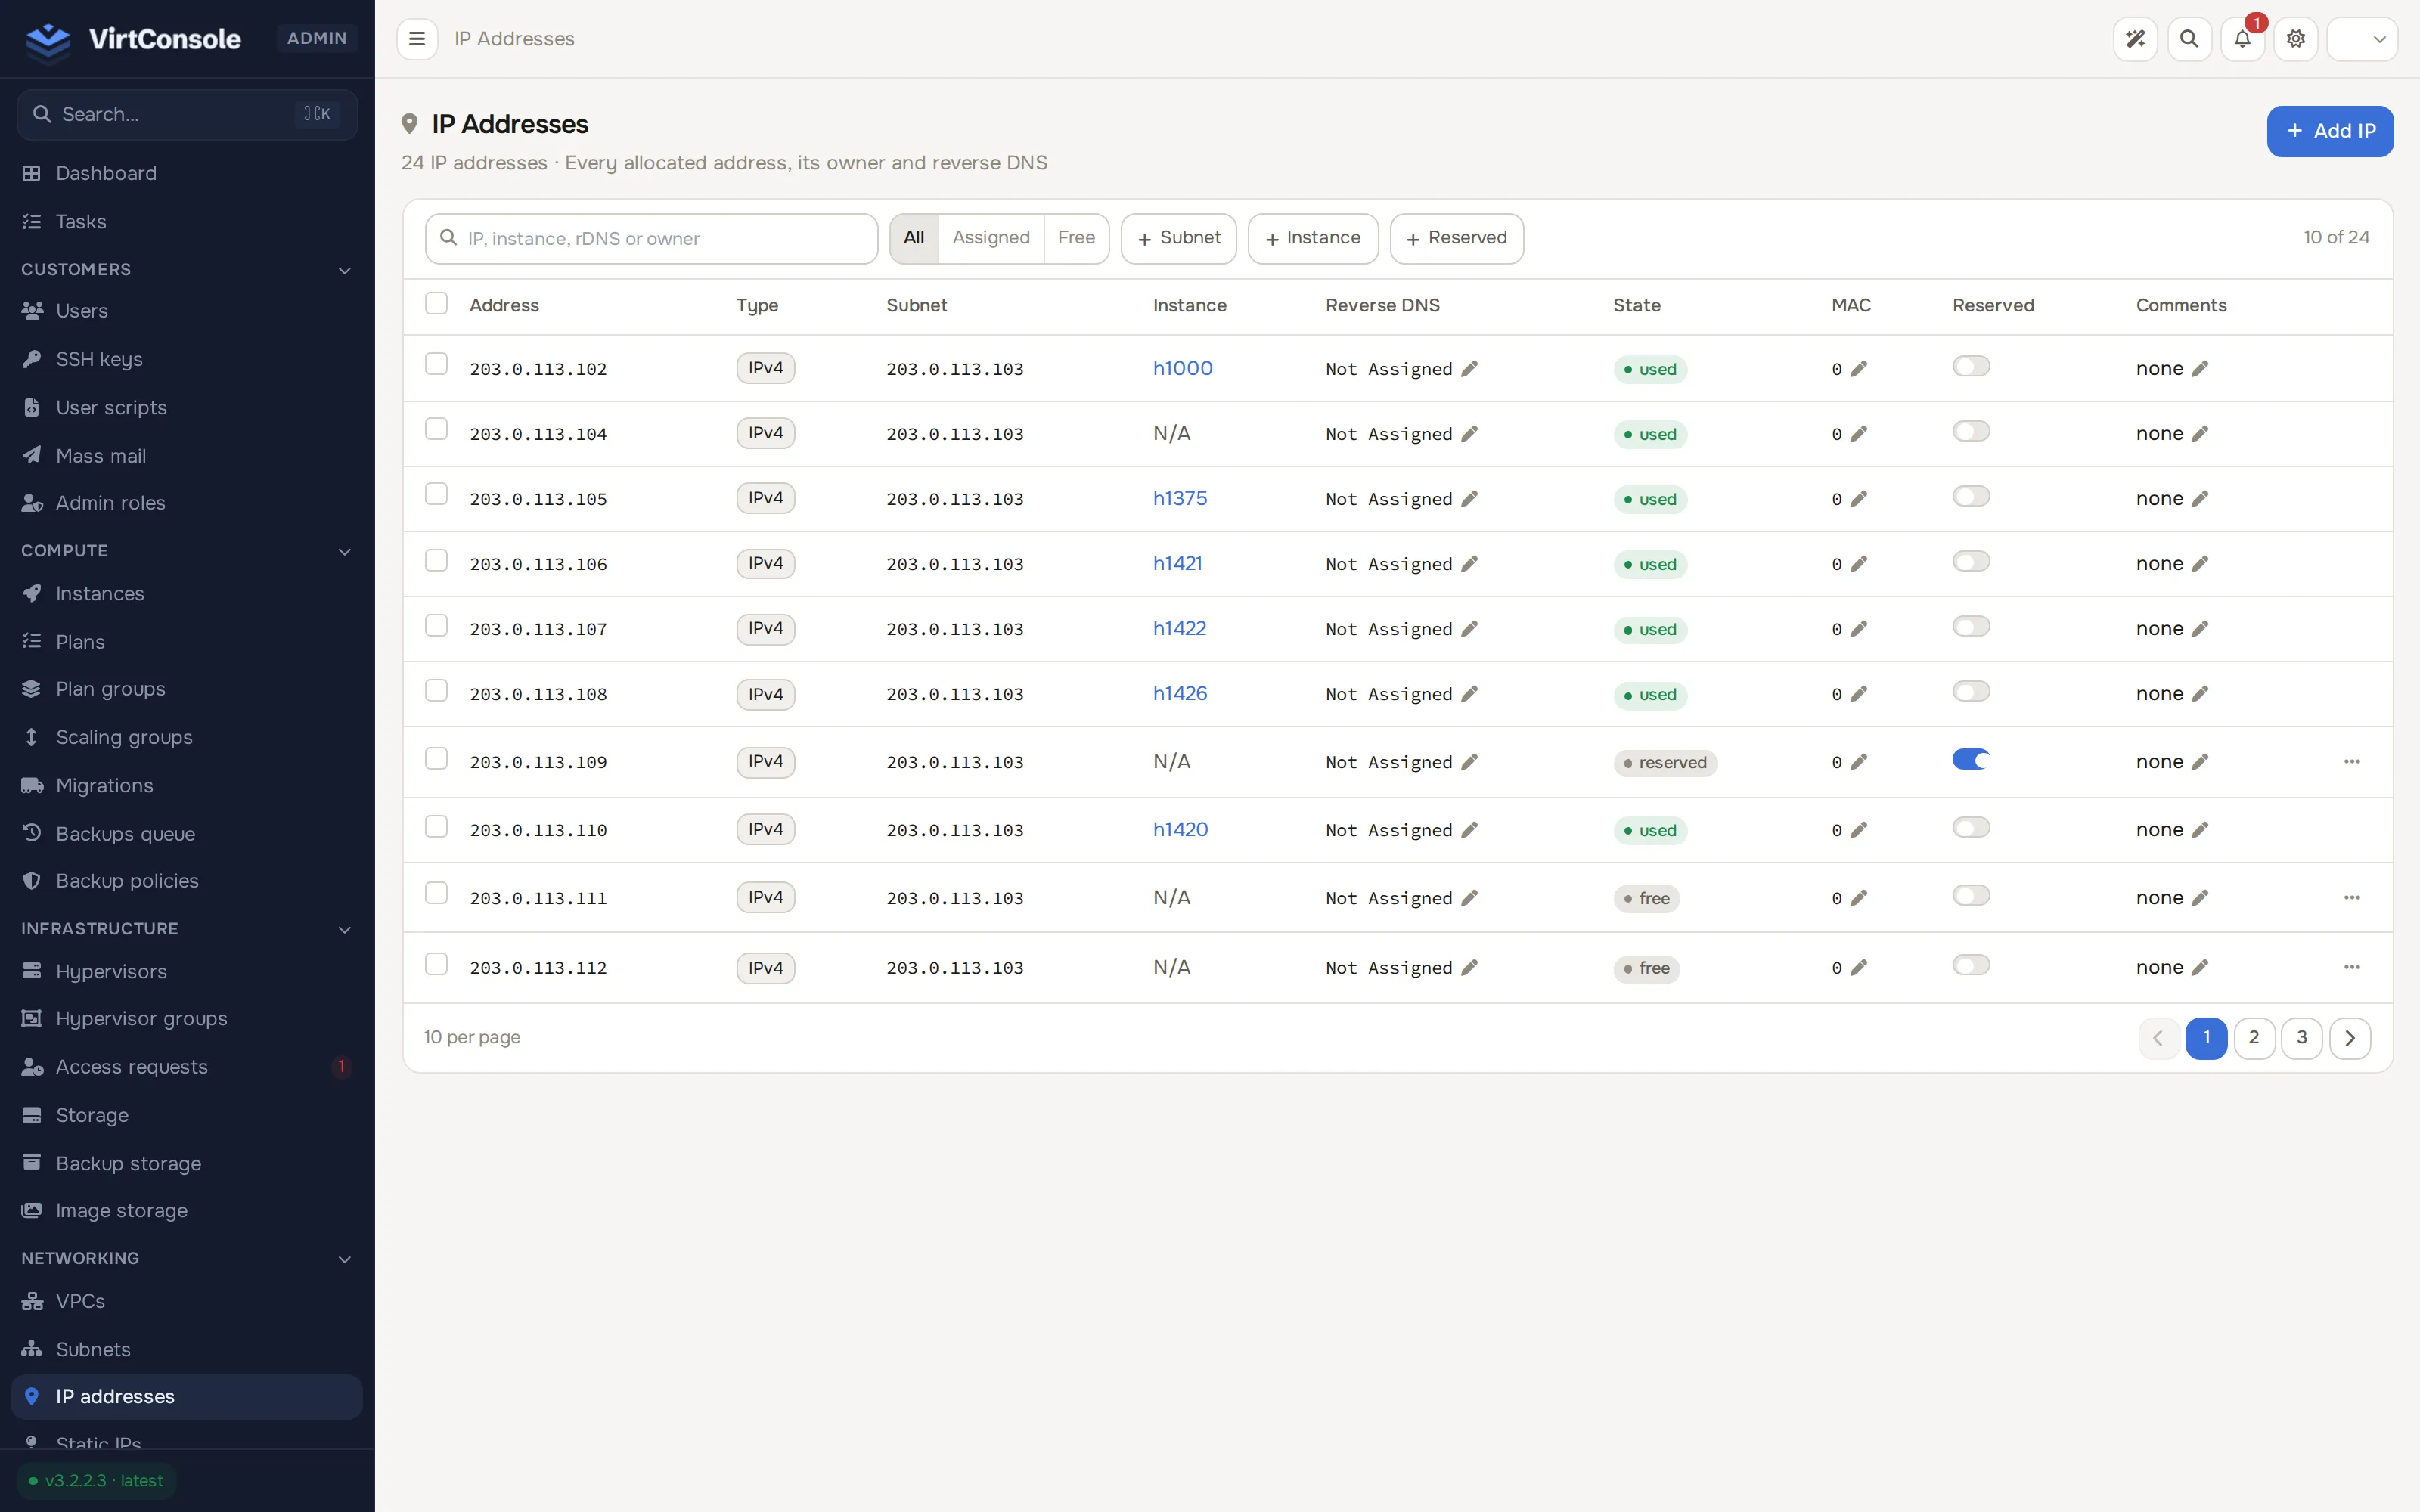
Section titled “Manage the IP list”In the admin panel go to Networking > IP addresses. This page lists every IP across all subnets, and also lets you add individual IPs or a range directly, alongside the subnet page’s bulk generator.
Filter with the All / Assigned / Free pills, search by IP, instance, or rDNS, or add a Subnet, Instance, or Reserved filter.
| Column | Meaning |
|---|---|
| Address | The address. IPv6 subnets render as ip/mask. |
| Type | IPv4 or IPv6. |
| Subnet | The gateway of the subnet the IP belongs to. |
| Instance | The instance currently using the IP. |
| Reverse DNS | Click the edit icon to set a PTR hostname, for example vm-12.example.com. |
| State | free, used, or reserved. |
| MAC | Click the edit icon to set the MAC for provider-locked IPs. |
| Reserved | Toggle to reserve the IP so instances do not claim it. |
| Comments | A free-text note, click the edit icon to set it. |
Add an IP here
Section titled “Add an IP here”Click Add IP. Pick Single IP or Range, a Subnet, and either an Address or a Range start / Range end. This is a shortcut for adding to an existing subnet without opening its own page; the subnet’s Generate IPs card (above) is still the place for IPv6 subnets and MAC-tagged individual IPv4s.
To remove an unassigned IP, open its row’s actions menu and click Remove.
Edit a subnet
Section titled “Edit a subnet”Open the subnet, change what you need, then click Update Subnet. Protocol and Mode cannot change after creation. The editable cards are:
- General: name, netmask, gateway.
- DNS: the two resolvers, with the same provider shortcut buttons.
- Networking: Interface (NAT mode) or Bridge (bridged and routed modes).
- Assignment: Hypervisors, RDNS Zone (the reverse zone that receives PTR records for this subnet), and Auto-rDNS (on deploy, set the primary public IP’s PTR to the instance hostname; needs an enabled rDNS zone and a base domain). See Reverse DNS.
- Settings: the Enabled toggle.
What happens next
Section titled “What happens next”Generated IPs show as free in Networking > IP addresses. The available counts shown for a subnet and a hypervisor use one rule: an address is available when it is free, not reserved, not held by a NAT gateway and not part of a running migration. When a customer deploys an instance, the panel claims free IPs from the subnets attached to the chosen hypervisor. With Auto-rDNS on, the PTR record is written at deploy time.
Common problems
Section titled “Common problems”- Instances on two hypervisors cannot talk over a private subnet. The subnet must be attached to both hypervisors, and a VLAN must connect them on the private network.
- A new interface gets no IP. The generated pool is exhausted. Generate more IPs on the subnet page.
- Instances with extra IPs have no connectivity on a MAC-locked provider. Set the MAC on each IP, either in the generator or on the IP Addresses page.
- Ping works but real traffic fails. A security group with ingress rules drops anything not explicitly allowed. Check the attached groups. See Security groups.