Live Migration
Overview
Live Migration moves a running virtual machine (a single VM is called an instance) from one hypervisor host to another without shutting it down. The instance keeps running on the source while its memory is copied to the destination, then pauses for under one second while the final bytes transfer, and resumes on the destination. Customers do not notice; TCP connections usually survive.
Admins use this for hardware maintenance, balancing load between hosts, or moving a customer onto faster hardware.
Concepts
- Hypervisor: a physical KVM compute node that runs VMs.
- Shared storage: a storage backend (NFS, Ceph, iSCSI SAN) that both the source and destination hypervisors can mount at the same time. When both can see the same disk file, only memory needs to be copied.
- Block migration: when storage is not shared, the disk contents are copied over the network alongside the memory.
- Libvirt: the management daemon that controls KVM on each hypervisor.
- QEMU: the actual virtualization engine that runs each VM.
- Post-copy: an advanced mode that starts the VM on the destination before all memory is copied. Faster but riskier.
- Auto-converge: an option that briefly throttles a busy VM so the migration can finish.
How a migration runs
- The instance keeps running on the source.
- Memory and CPU state are copied to the destination.
- Disk is either accessed from shared storage or copied over.
- The VM pauses for under a second for a final sync.
- The VM resumes on the destination. Network connectivity is kept.
Migration types
Shared storage migration (recommended)
For VMs whose disks live on shared storage that both hypervisors can mount.
- Speed: typically 5 to 10 minutes.
- Pause: under one second.
- What moves over the network: memory and CPU state only.
- Requirement: the destination can mount the same storage backend with the same path.
Block migration
For VMs whose disks live on local storage of the source hypervisor.
- Speed: 15 minutes to over an hour, depending on disk size.
- Pause: under one second.
- What moves: memory, CPU state, and the full disk contents.
- Requirement: the destination has enough free disk space for the whole VM.
Hypervisor requirements
Network
Source and destination must reach each other directly. No NAT (Network Address Translation, a router feature that rewrites IP addresses) and no firewall in the path.
Required open ports:
| Port | Protocol | Direction | Purpose |
|---|---|---|---|
| 22 (or your custom SSH port) | TCP | Both ways | SSH (Secure Shell, the standard encrypted remote-login protocol) for orchestrating the migration. Set the port in the hypervisor configuration page. |
| 16509 | TCP | Destination to source | Libvirt remote API (optional, used for monitoring) |
| 49152-49215 | TCP | Both ways | The actual migration data transfer |
Example iptables rules on both sides:
# Allow SSH
iptables -A INPUT -p tcp --dport 22 -s <other-server-ip> -j ACCEPT
# Allow libvirt
iptables -A INPUT -p tcp --dport 16509 -s <other-server-ip> -j ACCEPT
# Allow migration data transfer
iptables -A INPUT -p tcp --dport 49152:49215 -s <other-server-ip> -j ACCEPT
Bandwidth: 1 Gbps minimum, 10 Gbps preferred. Latency under 10 ms (same datacenter or campus).
CPU compatibility
- Same vendor on both sides (Intel-to-Intel or AMD-to-AMD).
- Compatible CPU generations.
- Same instruction-set features (SSE, AVX, etc.). A VM started on a CPU with AVX cannot resume on a CPU without it.
Memory
The destination must have enough free RAM. Rule of thumb: free RAM >= instance RAM + 2 GB.
Storage
For block migration, the destination must have free disk capacity at least equal to the VM's disk size.
Software
Both sides must run:
- Same or close Linux distribution.
- Libvirt 7.0 or newer (recommended).
- QEMU 5.0 or newer (recommended).
- SSH server running.
Performing a live migration
Step 1: pre-check
- SSH works between the two hypervisors.
- Firewall ports listed above are open.
- Destination has enough RAM (and disk for block migration).
- Source CPU and destination CPU are compatible.
- The instance is running and has no other task in progress.
Step 2: start the migration
- Open Compute > Instances and find the VM.
- Click the instance, then Actions > Live Migrate.
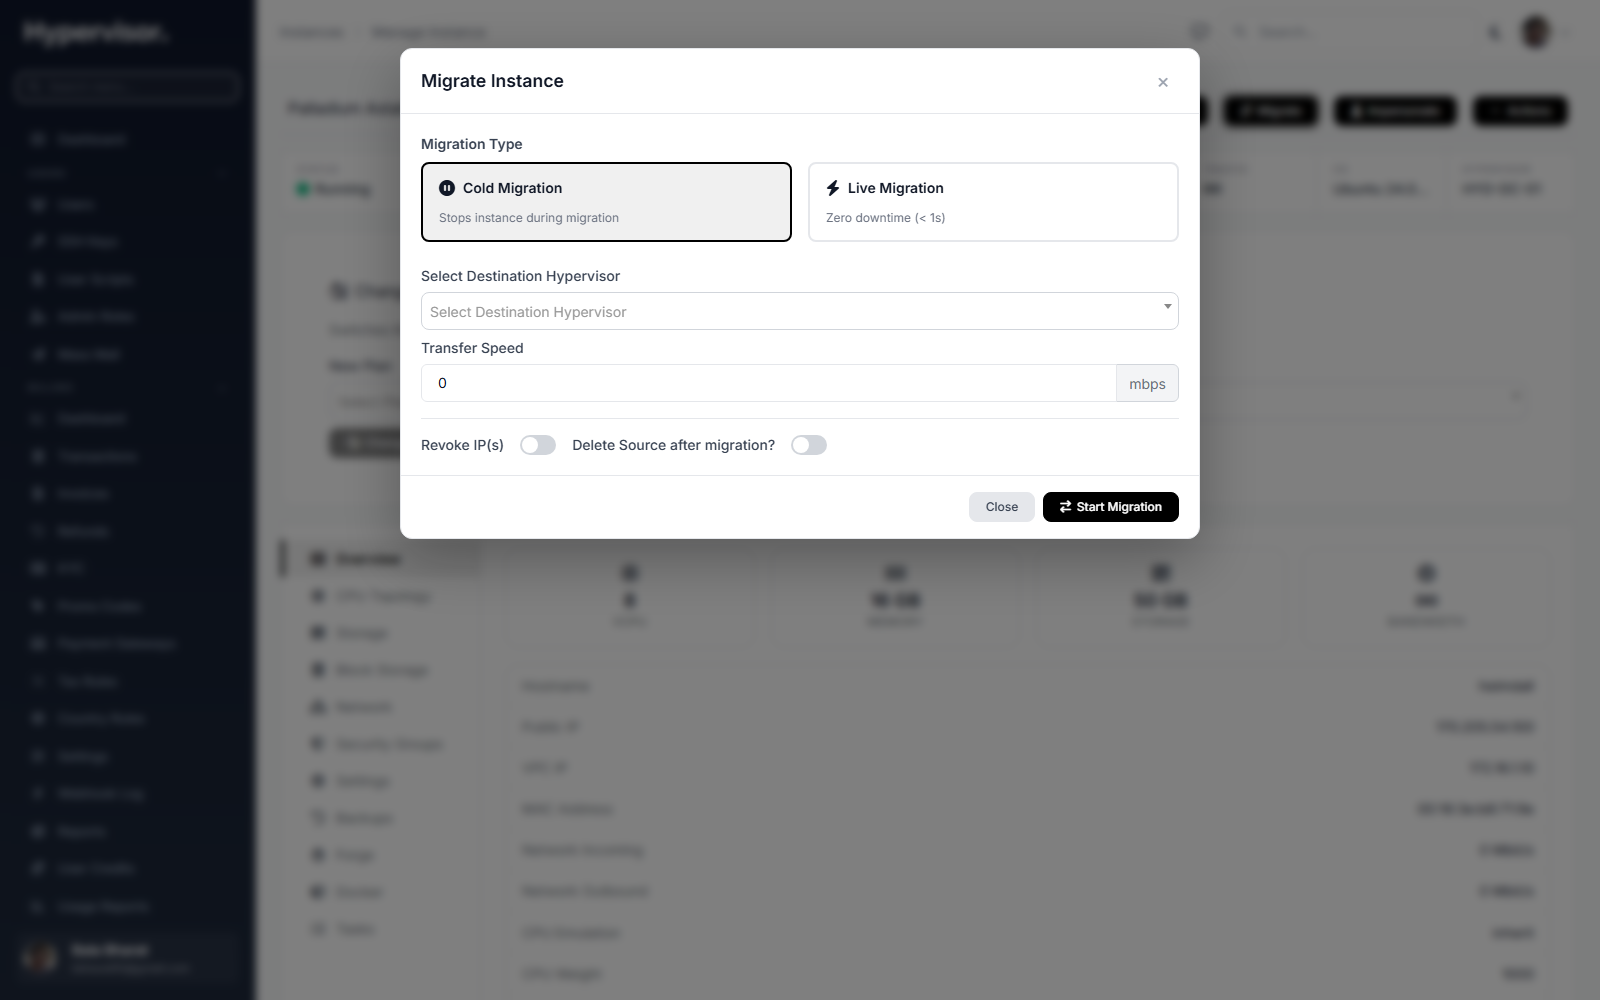
- Fill out the dialog:
- Destination Server: pick the target hypervisor.
- IP Address Configuration: keep the existing IPs (only possible if the destination has the same subnets) or assign new ones.
- Storage Mapping: map each disk to a destination storage backend. The system auto-detects shared storage.
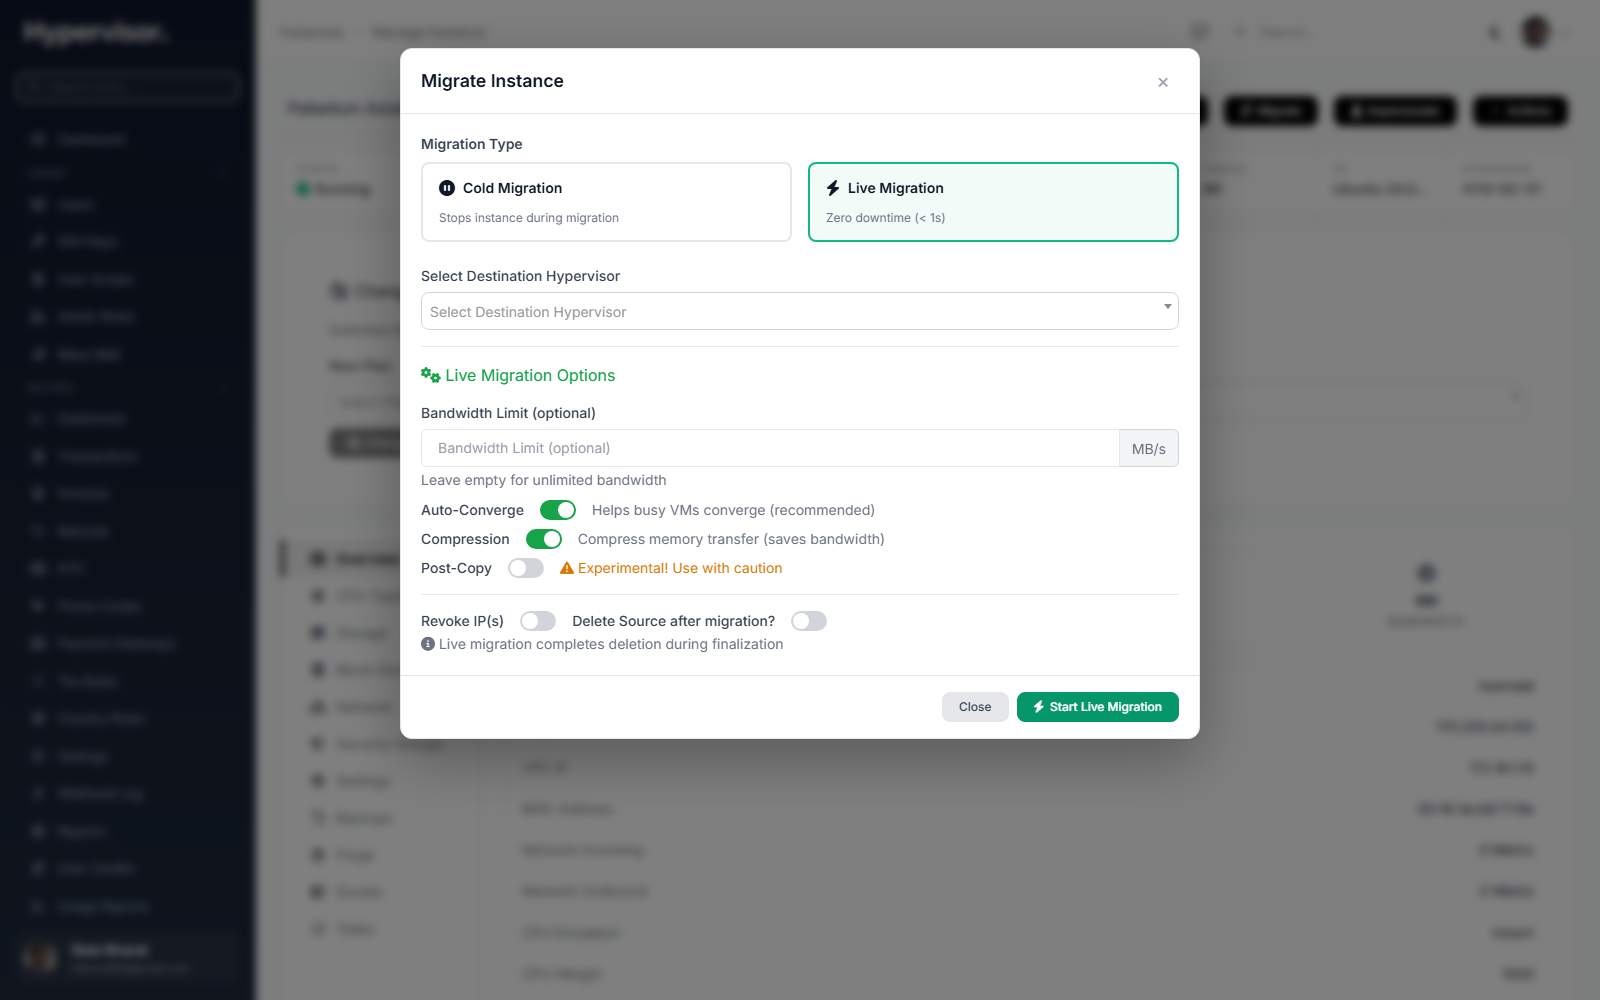
- Auto-Converge: recommended on. Helps a busy VM converge.
- Compression: recommended on. Reduces network use by 50 to 70 percent.
- Bandwidth Limit: optional, in MB/s. Useful when sharing the network with production traffic.
- Post-Copy: experimental. Leave off unless you have a specific reason.
Post-Copy starts the VM on the destination before all memory has been copied. If the network drops during this window, the VM is lost. Only enable it on dedicated, reliable links.
- Review the summary and click Start Live Migration.
The Migrate dialog also lets you pick the migration type. Cold Migration stops the instance first; Live Migration does it without downtime.
Switching to Live Migration reveals the full set of tuning options (auto-converge, compression, bandwidth limit, post-copy):
Step 3: monitor
The progress screen shows total percent complete, current phase, memory transferred, disk transferred (for block migration), estimated time remaining, iteration count, transfer speed, and accumulated downtime. Updates arrive every 10 seconds.
Step 4: completion
When done, the VM is running on the destination, the network is restored, and storage is mapped. If configured, the source side is cleaned up.
Tuning options
Auto-converge
Throttles the VM if memory is changing faster than it can be transferred. Enable for busy databases or any VM that keeps re-dirtying its pages. Side effect: a small slowdown of the VM during migration.
Compression
Compresses memory pages with the XBZRLE algorithm during transfer. Cuts bandwidth use by half or more with low CPU overhead. Enable unless you have a 10 Gbps dedicated link with bandwidth to spare.
Bandwidth limit
Caps migration traffic. Suggested values: 100 to 125 MB/s on a 1 Gbps link, 500 to 1000 MB/s on a 10 Gbps link. Leave blank for unlimited.
Post-copy mode
Starts the VM on the destination early, then pulls remaining memory on demand. Lowest pause but high risk. Use only on dedicated networks for VMs that otherwise will not converge.
Use Private Network
If the hypervisors have a dedicated private NIC (network card), tick Use Private Network to route migration traffic over it. Frees the public network and isolates the traffic.
Troubleshooting
Migration stalls and will not finish
Symptoms: stuck at 60 to 80 percent, memory never drains, ETA keeps growing.
Causes: the VM is dirtying memory faster than the network can transfer it.
Fixes:
- Enable Auto-Converge.
- Retry during a low-activity window.
- Reduce the workload on the VM temporarily.
- Consider Post-Copy (risk: see above).
Cannot connect to destination
Symptoms: fails immediately with "Cannot connect to destination".
Causes: firewall or SSH or routing problem.
Fixes:
- Confirm ports 22, 16509, and 49152-49215 are open.
- Test SSH from source to destination by hand.
- Check routing.
Insufficient storage
Symptoms: block migration fails with "No space left on device".
Fixes: free space on destination, fix the storage mapping, or use a different destination storage backend.
CPU incompatibility
Symptoms: VM crashes after migration or libvirt reports an unsupported CPU feature.
Fixes:
- Compare
lscpu | grep Flagson both hosts. - Use a CPU compatibility mode that exposes a smaller feature set.
- Pick a destination with a compatible CPU.
Instance does not start on destination
Check the migration logs for the actual error. Common causes: wrong storage path, network configuration mismatch.
Status reference
| Status | Meaning | Action |
|---|---|---|
| Pending | Queued | Wait |
| Preparing | Setting up | Normal |
| Migrating | In progress | Watch progress |
| Completing | Final sync | Almost done |
| Completed | Success | Verify the VM is up |
| Failed | Error | Read the error and the logs |
Expected downtime
- Typical: 200 to 500 milliseconds.
- Best case: under 100 milliseconds.
- Worst case: 1 to 2 seconds.
FAQ
Can a stopped VM be live-migrated?
No. Live migration requires a running VM. For stopped VMs, use cold migration instead.
Can I migrate across datacenters?
Yes, with caveats: block migration is required (slower), latency hurts performance, IP addresses likely change, and bandwidth between sites must be adequate.
What happens if migration fails?
The VM keeps running on the source. Read the error, fix it, retry.
Can I roll back?
Not directly. To go back, run another live migration in the reverse direction.
Does it work for all OSes?
Yes. Live migration is OS-agnostic; KVM does the work below the guest OS. Linux, Windows Server, BSD, etc. all migrate the same way.
Can multiple migrations run at once?
Yes, but two or three concurrent migrations is a reasonable cap. Each consumes network bandwidth and hypervisor CPU.
How secure is it?
SSH-encrypted, with temporary keys that auto-delete. Use the Private Network option to isolate migration traffic from the public network.
Related pages
- Cloud Service - hourly billing for running instances.
- Instance Images - save a VM as a reusable template.
- Orphan VM Import - adopt VMs that already exist on a hypervisor.